以下是在SpringBoot中接入ai deepseek的过程。我这里的环境是jdk1.8,官网暂时没有java的示例。
1. 创建 API key
新用户会有500万的免费token额度

2. 封装询问deepseek的工具方法
添加key值和询问路径。API_KEY为你创建的key值。这个在配置文件或者是写在常量文件都可以,我这是写在配置文件里了

接下来就是代码实例了
1 2 3 4 5 6 7 8 9 10 11 12 13 14 15 16 17 18 19 20 21 22 23 24 25 26 27 28 29 30 31 32 33 34 35 36 37 38 39 40 41 42 43 44 45 46 47 48 49 50 51 52 53 54 55 56 57 58 59 60 61 62 63 64 65 66 67 68 69 70 71 72 73 74 75 76 77 78 79 80 81 82 83 84 85 86 87 88 89 90 91 92 93 94 95 96 97 98 99 100 101 102 103 104 105 106 | import com.fasterxml.jackson.databind.JsonNode;import com.fasterxml.jackson.databind.ObjectMapper;import com.zhiwonders.paperserver.service.IAuthService;import lombok.extern.slf4j.Slf4j;import org.apache.http.client.methods.CloseableHttpResponse;import org.apache.http.client.methods.HttpPost;import org.apache.http.entity.StringEntity;import org.apache.http.impl.client.CloseableHttpClient;import org.apache.http.impl.client.HttpClients;import org.springframework.beans.factory.annotation.Autowired;import org.springframework.beans.factory.annotation.Value;import org.springframework.http.MediaType;import org.springframework.web.bind.annotation.*;import org.springframework.web.servlet.mvc.method.annotation.SseEmitter;import java.io.BufferedReader;import java.io.InputStreamReader;import java.nio.charset.StandardCharsets;import java.util.Collections;import java.util.HashMap;import java.util.Map;import java.util.concurrent.ExecutorService;import java.util.concurrent.Executors;@RestController@RequestMapping("/api/v1")@Slf4jpublic class OpenAIController { @Value("${ai.config.deepseek.apiKey}") private String API_KEY; @Value("${ai.config.deepseek.baseUrl}") private String API_URL; @Autowired private IAuthService authService; private final ExecutorService executorService = Executors.newCachedThreadPool(); private final ObjectMapper objectMapper = new ObjectMapper(); @PostMapping(value = "/chat", produces = MediaType.TEXT_EVENT_STREAM_VALUE) public SseEmitter chat(// @RequestHeader("Authorization")String token, @RequestBody String question) {// String openid = authService.openid(token);// if (openid == null) {// throw new RuntimeException("用户未登录");// } SseEmitter emitter = new SseEmitter(-1L); executorService.execute(() -> { try { log.info("流式回答开始,问题:{}", question); try (CloseableHttpClient client = HttpClients.createDefault()) { HttpPost request = new HttpPost(API_URL); request.setHeader("Content-Type", "application/json"); request.setHeader("Authorization", "Bearer " + API_KEY); Map message = new HashMap(); message.put("role", "user"); message.put("content", question); Map requestMap = new HashMap(); requestMap.put("model", "deepseek-chat"); requestMap.put("messages", Collections.singletonList(message)); requestMap.put("stream", true); String requestBody = objectMapper.writeValueAsString(requestMap); request.setEntity(new StringEntity(requestBody, StandardCharsets.UTF_8)); try (CloseableHttpResponse response = client.execute(request); BufferedReader reader = new BufferedReader( new InputStreamReader(response.getEntity().getContent(), StandardCharsets.UTF_8))) { String line; while ((line = reader.readLine()) != null) { if (line.startsWith("data: ")) { String jsonData = line.substring(6); if ("[DONE]".equals(jsonData)) { break; } JsonNode node = objectMapper.readTree(jsonData); String content = node.path("choices") .path(0) .path("delta") .path("content") .asText(""); if (!content.isEmpty()) { emitter.send(content); } } } log.info("流式回答结束,{}",question); emitter.complete(); } } catch (Exception e) { log.error("处理 Deepseek 请求时发生错误", e); emitter.completeWithError(e); } } catch (Exception e) { log.error("处理 Deepseek 请求时发生错误", e); emitter.completeWithError(e); } }); return emitter; }} |
3.调用测试
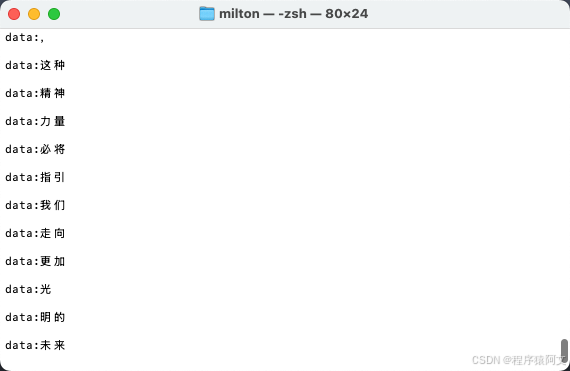
1 2 3 4 5 | curl -v -X POST -H "Content-Type: application/json" -d '"帮我写一篇2000字的 我的祖国的文字"' --no-buffer |
打开终端输入上述命令回车即可 但是端口必须要和你后端的一致 我这里是8091
4.运行结果

总结
到此这篇关于SpringBoot接入deepseek深度求索的文章就介绍到这了,更多相关SpringBoot接入deepseek深度求索内容请搜索IT俱乐部以前的文章或继续浏览下面的相关文章希望大家以后多多支持IT俱乐部!

