
一、Spring缓存支持
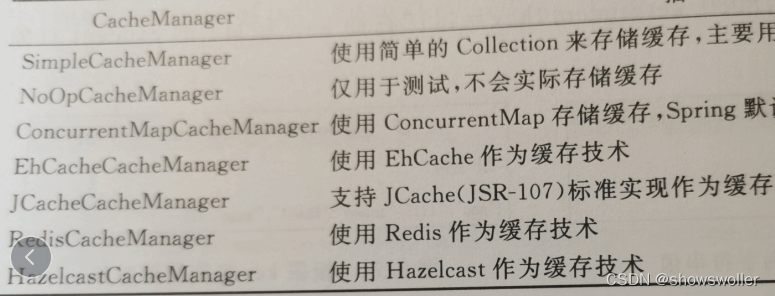
Spring框架定义了org.springframework.cache CacheManager和org.springframework.cache.Cache接口来统一不同的缓存技术
CacheManager常用方法如下
1、@Cacheable
该注解可以标记在一个方法上,也可以标记在一个类上,当标记在一个方法上时表示该方法是支持缓存的,当标记在一个类上时则表示该类所有的方法都是支持缓存的。对于一个支持缓存的方法,在方法执行前,Spring先检查缓存中是否存在方法返回的数据,如果存在则直接返回缓存数据,如果不存在,则调用方法并将方法返回值存入缓存
2、@CacheEvict
该注解用来标注在需要清楚缓存元素的方法或类上,当标记在一个类上时,表示其中所有方法的执行都会触发缓存的清除操作
3、@CachePut
该注解也可以声明一个方法支持缓存功能
4、Caching
该注解可以在一个方法或类上同时指定多个Spring Cache相关的注解
5、CacheConfig
该注解作用在类上可以设置当前缓存的一些公共设置
二、Spring Boot缓存支持
1:创建基于spring-voot-starter-cache 和spring-boot-starter-data-jpa依赖的Spring BootWeb应用
2:配置application.properties文件 代码如下
server.servlet.context-path=/ch6_10
###
##数据源信息配置
###
#数据库地址
spring.datasource.url=jdbc:mysql://localhost:3306/springbootjpa?characterEncoding=utf8
#数据库用户名
spring.datasource.username=root
#数据库密码
spring.datasource.password=root
#数据库驱动
spring.datasource.driver-class-name=com.mysql.jdbc.Driver
####
#JPA持久化配置
####
#指定数据库类型
spring.jpa.database=MYSQL
#指定是否在日志中显示SQL语句
spring.jpa.show-sql=true
#指定自动创建、更新数据库表等配置,update表示如果数据库中存在持久化类对应的表就不创建,不存在就创建对应的表
spring.jpa.hibernate.ddl-auto=update
#让控制器输出的JSON字符串格式更美观
spring.jackson.serialization.indent-output=true
3:修改pom.xml文件 添加mysql依赖
1 2 3 4 5 6 7 8 9 10 11 12 | -4.0.0-org.springframework.bootspring-boot-starter-parent2.1.8.RELEASEcom.chch6_100.0.1-SNAPSHOTch6_10Demo project for Spring Boot-11--org.springframework.bootspring-boot-starter-cache-org.springframework.bootspring-boot-starter-data-jpa-org.springframework.bootspring-boot-starter-web-mysqlmysql-connector-java5.1.45-org.springframework.bootspring-boot-starter-testtest---org.springframework.bootspring-boot-maven-plugin |
4:创建持久化实体类
代码如下
1 2 3 4 5 6 7 8 9 10 11 12 13 14 15 16 17 18 19 20 21 22 23 24 25 26 27 28 29 30 31 32 33 34 35 36 37 38 39 40 41 42 43 44 45 46 47 48 49 50 51 52 53 54 | package com.ch.ch6_10.entity;import java.io.Serializable;import javax.persistence.Entity;import javax.persistence.GeneratedValue;import javax.persistence.GenerationType;import javax.persistence.Id;import javax.persistence.Table;import com.fasterxml.jackson.annotation.JsonIgnoreProperties;@Entity@Table(name = "student_table")@JsonIgnoreProperties(value = {"hibernateLazyInitializer"})public class Student implements Serializable{ private static final long serialVersionUID = 1L; @Id @GeneratedValue(strategy = GenerationType.IDENTITY) private int id;//主键 private String sno; private String sname; private String ssex; public Student() { super(); } public Student(int id, String sno, String sname, String ssex) { super(); this.id = id; this.sno = sno; this.sname = sname; this.ssex = ssex; } public int getId() { return id; } public void setId(int id) { this.id = id; } public String getSno() { return sno; } public void setSno(String sno) { this.sno = sno; } public String getSname() { return sname; } public void setSname(String sname) { this.sname = sname; } public String getSsex() { return ssex; } public void setSsex(String ssex) { this.ssex = ssex; } } |
5:创建数据访问接口
1 2 3 4 5 | package com.ch.ch6_10.repository;import org.springframework.data.jpa.repository.JpaRepository;import com.ch.ch6_10.entity.Student;public interface StudentRepository extends JpaRepository{} |
6:创建业务层 包括一个接口和一个实现类
接口代码如下
1 2 3 4 5 6 7 | package com.ch.ch6_10.service;import com.ch.ch6_10.entity.Student;public interface StudentService { public Student saveStudent(Student student); public void deleteCache(Student student); public Student selectOneStudent(Integer id);} |
实现类代码如下
1 2 3 4 5 6 7 8 9 10 11 12 13 14 15 16 17 18 19 20 21 22 23 24 25 26 27 28 29 30 31 32 | package com.ch.ch6_10.service;import org.springframework.beans.factory.annotation.Autowired;import org.springframework.cache.annotation.CacheEvict;import org.springframework.cache.annotation.CachePut;import org.springframework.cache.annotation.Cacheable;import org.springframework.stereotype.Service;import com.ch.ch6_10.entity.Student;import com.ch.ch6_10.repository.StudentRepository;@Servicepublic class StudentServiceImpl implements StudentService{ @Autowired private StudentRepository studentRepository; @Override @CachePut(value = "student", key="#student.id") public Student saveStudent(Student student) { Student s = studentRepository.save(student); System.out.println("为key=" + student.getId() + "数据做了缓存"); return s; } @Override @CacheEvict(value = "student", key="#student.id") public void deleteCache(Student student) { System.out.println("删除了key=" + student.getId() + "的数据缓存"); } @Override @Cacheable(value = "student") public Student selectOneStudent(Integer id) { Student s = studentRepository.getOne(id); System.out.println("为key=" + id + "数据做了缓存"); return s; }} |
7:创建控制器层
1 2 3 4 5 6 7 8 9 10 11 12 13 14 15 16 17 18 19 20 21 22 23 24 | package com.ch.ch6_10.controller;import org.springframework.beans.factory.annotation.Autowired;import org.springframework.web.bind.annotation.RequestMapping;import org.springframework.web.bind.annotation.RestController;import com.ch.ch6_10.entity.Student;import com.ch.ch6_10.service.StudentService;@RestControllerpublic class TestCacheController { @Autowired private StudentService studentService; @RequestMapping("/savePut") public Student save(Student student) { return studentService.saveStudent(student); } @RequestMapping("/selectAble") public Student select(Integer id) { return studentService.selectOneStudent(id); } @RequestMapping("/deleteEvict") public String deleteCache(Student student) { studentService.deleteCache(student); return "ok"; }} |
8:在主类中开启缓存支持
1 2 3 4 5 6 7 8 9 10 11 | package com.ch.ch6_10;import org.springframework.boot.SpringApplication;import org.springframework.boot.autoconfigure.SpringBootApplication;import org.springframework.cache.annotation.EnableCaching;@EnableCaching@SpringBootApplicationpublic class Ch610Application { public static void main(String[] args) { SpringApplication.run(Ch610Application.class, args); }} |
到此这篇关于SpringBoot与Spring中数据缓存Cache超详细讲解的文章就介绍到这了,更多相关SpringBoot数据缓存Cache内容请搜索IT俱乐部以前的文章或继续浏览下面的相关文章希望大家以后多多支持IT俱乐部!

