
前言
在项目的开发时,遇到实现服务器主动发送数据到前端页面的功能的需求。实现该功能不外乎使用轮询和websocket技术,但在考虑到实时性和资源损耗后,最后决定使用websocket。现在就记录一下用Java实现Websocket技术吧~
Java实现Websocket通常有两种方式:1、创建WebSocketServer类,里面包含open、close、message、error等方法;2、利用Springboot提供的webSocketHandler类,创建其子类并重写方法。我们项目虽然使用Springboot框架,不过仍采用了第一种方法实现。
创建WebSocket的简单实例操作流程
1.引入Websocket依赖
1 | org.springframework.bootspring-boot-starter-websocket2.7.0 |
2.创建配置类WebSocketConfig
1 2 3 4 5 6 7 8 9 10 11 12 13 14 | import org.springframework.context.annotation.Bean;import org.springframework.context.annotation.Configuration;import org.springframework.web.socket.server.standard.ServerEndpointExporter;/** * 开启WebSocket支持 */@Configurationpublic class WebSocketConfig { @Bean public ServerEndpointExporter serverEndpointExporter() { return new ServerEndpointExporter(); }} |
3.创建WebSocketServer
在websocket协议下,后端服务器相当于ws里面的客户端,需要用@ServerEndpoint指定访问路径,并使用@Component注入容器
@ServerEndpoint:当ServerEndpointExporter类通过Spring配置进行声明并被使用,它将会去扫描带有@ServerEndpoint注解的类。被注解的类将被注册成为一个WebSocket端点。所有的配置项都在这个注解的属性中
( 如:@ServerEndpoint(“/ws”) )
下面的栗子中@ServerEndpoint指定访问路径中包含sid,这个是用于区分每个页面
1 2 3 4 5 6 7 8 9 10 11 12 13 14 15 16 17 18 19 20 21 22 23 24 25 26 27 28 29 30 31 32 33 34 35 36 37 38 39 40 41 42 43 44 45 46 47 48 49 50 51 52 53 54 55 56 57 58 59 60 61 62 63 64 65 66 67 68 69 70 71 72 73 74 75 76 77 78 79 80 81 82 83 84 85 86 87 88 89 90 91 92 93 94 95 96 97 98 99 100 101 102 103 104 105 106 107 108 109 110 111 112 113 114 115 116 117 118 119 120 121 122 123 124 125 126 127 128 129 130 131 132 133 134 135 136 137 138 139 140 141 142 143 144 145 146 147 | import com.alibaba.fastjson.JSONObject;import lombok.extern.slf4j.Slf4j;import org.springframework.stereotype.Component;import org.springframework.util.StringUtils;import javax.websocket.*;import javax.websocket.server.PathParam;import javax.websocket.server.ServerEndpoint;import java.io.IOException;import java.net.Socket;import java.util.*;import java.util.concurrent.ConcurrentHashMap;/** * @ServerEndpoint 注解是一个类层次的注解,它的功能主要是将目前的类定义成一个websocket服务器端, * 注解的值将被用于监听用户连接的终端访问URL地址,客户端可以通过这个URL来连接到WebSocket服务器端 */@ServerEndpoint("/notice/{userId}")@Component@Slf4jpublic class NoticeWebsocket { //记录连接的客户端 public static Map clients = new ConcurrentHashMap(); /** * userId关联sid(解决同一用户id,在多个web端连接的问题) */ public static Map> conns = new ConcurrentHashMap(); private String sid = null; private String userId; /** * 连接成功后调用的方法 * @param session * @param userId */ @OnOpen public void onOpen(Session session, @PathParam("userId") String userId) { this.sid = UUID.randomUUID().toString(); this.userId = userId; clients.put(this.sid, session); Set clientSet = conns.get(userId); if (clientSet==null){ clientSet = new HashSet(); conns.put(userId,clientSet); } clientSet.add(this.sid); log.info(this.sid + "连接开启!"); } /** * 连接关闭调用的方法 */ @OnClose public void onClose() { log.info(this.sid + "连接断开!"); clients.remove(this.sid); } /** * 判断是否连接的方法 * @return */ public static boolean isServerClose() { if (NoticeWebsocket.clients.values().size() == 0) { log.info("已断开"); return true; }else { log.info("已连接"); return false; } } /** * 发送给所有用户 * @param noticeType */ public static void sendMessage(String noticeType){ NoticeWebsocketResp noticeWebsocketResp = new NoticeWebsocketResp(); noticeWebsocketResp.setNoticeType(noticeType); sendMessage(noticeWebsocketResp); } /** * 发送给所有用户 * @param noticeWebsocketResp */ public static void sendMessage(NoticeWebsocketResp noticeWebsocketResp){ String message = JSONObject.toJSONString(noticeWebsocketResp); for (Session session1 : NoticeWebsocket.clients.values()) { try { session1.getBasicRemote().sendText(message); } catch (IOException e) { e.printStackTrace(); } } } /** * 根据用户id发送给某一个用户 * **/ public static void sendMessageByUserId(String userId, NoticeWebsocketResp noticeWebsocketResp) { if (!StringUtils.isEmpty(userId)) { String message = JSONObject.toJSONString(noticeWebsocketResp); Set clientSet = conns.get(userId); if (clientSet != null) { Iterator iterator = clientSet.iterator(); while (iterator.hasNext()) { String sid = iterator.next(); Session session = clients.get(sid); if (session != null) { try { session.getBasicRemote().sendText(message); } catch (IOException e) { e.printStackTrace(); } } } } } } /** * 收到客户端消息后调用的方法 * @param message * @param session */ @OnMessage public void onMessage(String message, Session session) { log.info("收到来自窗口"+this.userId+"的信息:"+message); } /** * 发生错误时的回调函数 * @param error */ @OnError public void onError(Throwable error) { log.info("错误"); error.printStackTrace(); }} |
封装了一个发送消息的对象可以直接使用
1 2 3 4 5 6 7 8 9 10 11 12 13 14 15 | import io.swagger.annotations.ApiModel;import io.swagger.annotations.ApiModelProperty;import lombok.Data;@Data@ApiModel("ws通知返回对象")public class NoticeWebsocketResp { @ApiModelProperty(value = "通知类型") private String noticeType; @ApiModelProperty(value = "通知内容") private T noticeInfo;} |
4.websocket调用
一个用户调用接口,主动将信息发给后端,后端接收后再主动推送给指定/全部用户
1 2 3 4 5 6 7 8 9 | @RestController@RequestMapping("/order")public class OrderController { @GetMapping("/test") public R test() { NoticeWebsocket.sendMessage("你好,WebSocket"); return R.ok(); }} |
前端WebSocket连接
1 2 3 4 5 6 7 8 9 10 11 12 13 14 15 16 17 18 19 20 21 22 23 24 25 26 27 28 29 30 31 32 33 34 35 36 37 38 39 40 41 42 43 | <title>SseEmitter</title><div id="message"></div>var limitConnect = 0;init();function init() {var ws = new WebSocket('ws://192.168.2.88:9060/notice/1');// 获取连接状态console.log('ws连接状态:' + ws.readyState);//监听是否连接成功ws.onopen = function () { console.log('ws连接状态:' + ws.readyState); limitConnect = 0; //连接成功则发送一个数据 ws.send('我们建立连接啦');}// 接听服务器发回的信息并处理展示ws.onmessage = function (data) { console.log('接收到来自服务器的消息:'); console.log(data); //完成通信后关闭WebSocket连接 // ws.close();}// 监听连接关闭事件ws.onclose = function () { // 监听整个过程中websocket的状态 console.log('ws连接状态:' + ws.readyState);reconnect();}// 监听并处理error事件ws.onerror = function (error) { console.log(error);}}function reconnect() { limitConnect ++; console.log("重连第" + limitConnect + "次"); setTimeout(function(){ init(); },2000); } |
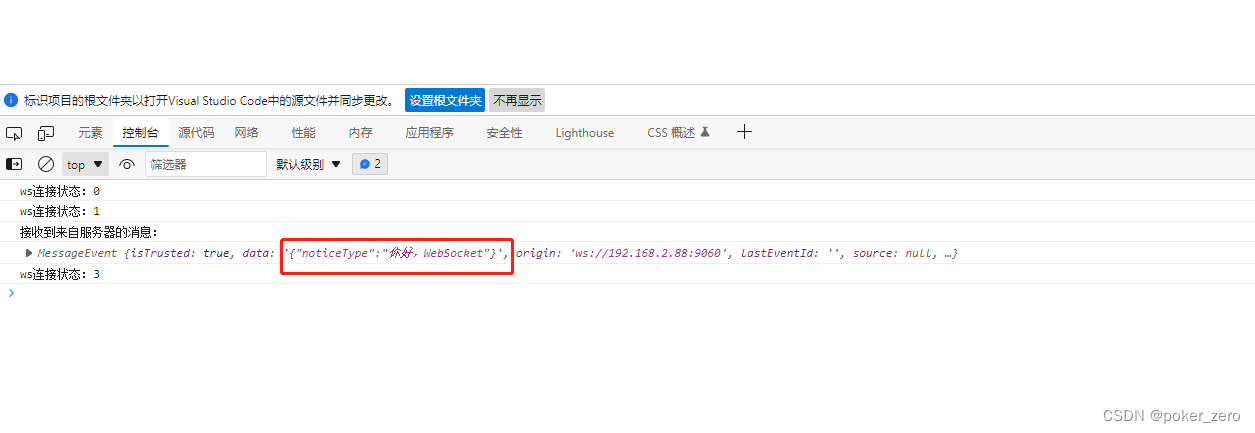
项目启动,打开页面后控制台打印连接信息

调用order/test方法后前端打印推送消息内容
这样,就可以接口或者ws调用网址的方式进行websocket的通信啦~
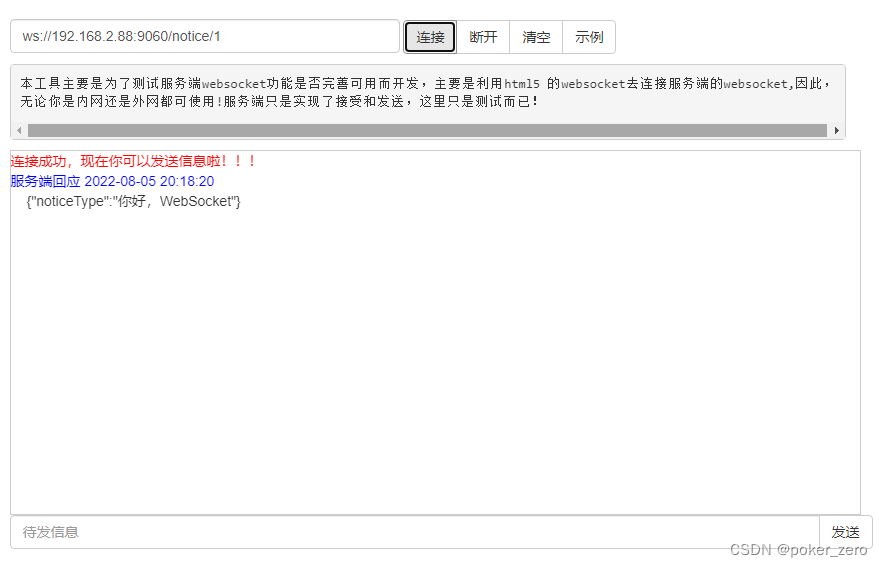
如果没有前端页面也可以使用在线WebSocket测试
总结
到此这篇关于java后端+前端使用WebSocket实现消息推送的文章就介绍到这了,更多相关javaWebSocket实现消息推送内容请搜索IT俱乐部以前的文章或继续浏览下面的相关文章希望大家以后多多支持IT俱乐部!

