
配置文件的读取顺序
- 根目录/config/application.properties
- 根目录/config/application.yml
- 根目录/application.properties
- 根目录/application.yml
- classpath目录/config/application.properties
- classpath目录/config/application.yml
- classpath目录/application.properties
- classpath目录/application.yml
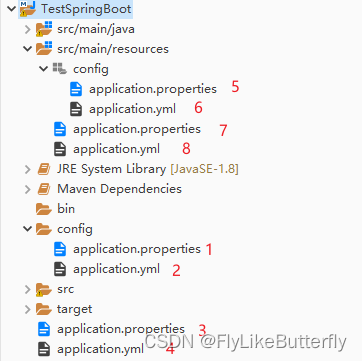
默认可读取的配置文件全部都会被读取合并,按照顺序读取配置,相同的配置项按第一次读取的值为准,同一个目录下properties文件比yml优先读取,通常会把配置文件放到classpath下,一般是resources里;
多坏境的配置文件
通常可以使用4个配置文件:(yml也同理)
- application.properties:默认配置文件
- application-dev.properties:开发环境配置文件
- application-prod.properties:生产环境配置文件
- application-test.properties:测试环境配置文件
在application.properties里配置spring.profiles.active以指定使用哪个配置文件,可以配置dev、prod、test分别对应以-dev、-prod、-test结尾的配置文件;(yml配置文件也是同理)
也可以在命令行使用spring.profiles.active指定,例如:java -jarxxxxxx.jar–spring.profiles.active=dev;
个性化配置
对于更特殊的个性化配置可以使用@Profile注解指定;
@Profile标签可以用在@Component或者@Configuration修饰的类上,可以标记类和方法,用来指定配置名字,然后使用spring.profiles.active指定该配置名字就可生效;
就像这样:
1 2 3 4 5 6 7 8 9 10 11 12 13 14 15 16 17 18 19 20 21 22 | package testspringboot.test2;import org.springframework.context.annotation.Bean;import org.springframework.context.annotation.Configuration;import org.springframework.context.annotation.Profile;@Configuration@Profile("myconfig")public class MyConfig { @Bean("Tom") @Profile("A") public String a() { return "tomtom"; } @Bean("Tom") @Profile("B") public String b() { return "TOMTOM"; } @Bean("Tom") public String c() { return "ttoomm"; }} |
然后写一个controller类:
1 2 3 4 5 6 7 8 9 10 11 12 13 14 15 | package testspringboot.test2;import javax.annotation.Resource;import org.springframework.web.bind.annotation.RequestMapping;import org.springframework.web.bind.annotation.RestController;@RestController@RequestMapping("/test2controller")public class Test2Controller { @Resource(name = "Tom") public String t; @RequestMapping("/test2") public String test2() { System.out.println(t); return "TEST2" + t; }} |
启动类:
1 2 3 4 5 6 7 8 9 10 11 12 | package testspringboot.test2;import org.springframework.boot.SpringApplication;import org.springframework.boot.autoconfigure.SpringBootApplication;@SpringBootApplicationpublic class Test2Main { /** * @param args */ public static void main(String[] args) { SpringApplication.run(Test2Main.class, args); }} |
配置文件里配置:
server.port=8888
server.servlet.context-path=/testspringboot
spring.profiles.active=myconfig
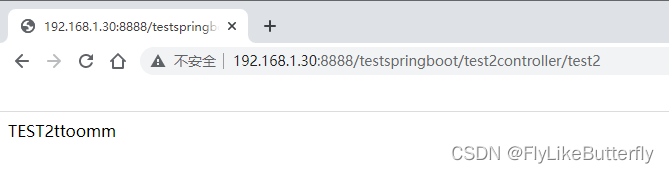
只指定myconfig配置,则MyConfig类里c()的bean生效,访问结果是:
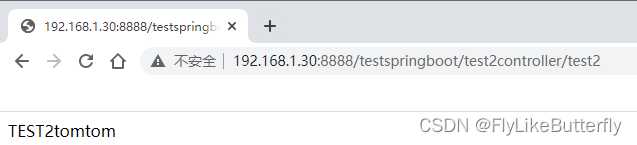
修改spring.profiles.active=myconfig,A,则MyConfig类里标记@Profile(“A”)的bean生效:
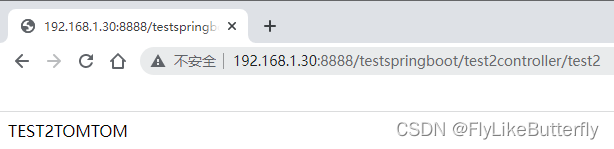
修改spring.profiles.active=myconfig,B,则标记@Profile(“B”)的bean生效:
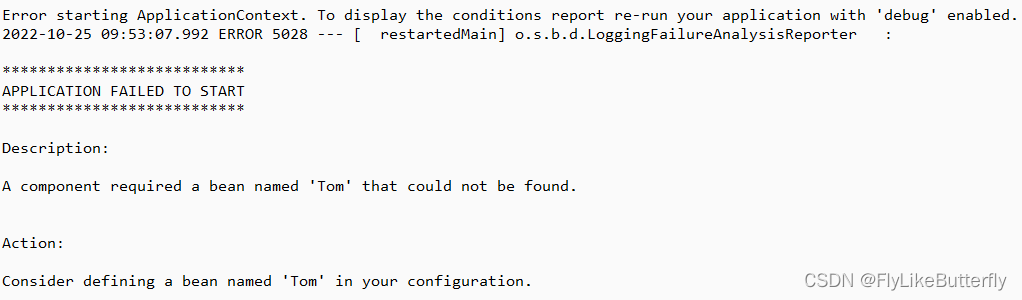
如果去掉spring.profiles.active配置,则就找不到MyConfig里的配置了,启动失败:
自定义配置文件名称和路径
可以使用@PropertySource标签指定自定义的配置文件名称和路径;(默认能加载到的配置文件也会先被加载)

通常只会用到设置配置文件的名字,并且配置文件的名字可以随便定义,可以叫xxxx.properties、a.txt、b.abc等等,但是内容格式需要跟.properties一致,即kv格式,所以不能直接加载yml格式的配置文件;
@PropertySource默认加载路径是classpath下,可以使用classpath:xxxx/xxxx/xxxx.properties指定目录和文件,如果使用根目录则需要使用file:xxxx/xxxx/xxxx.properties;
可以使用@PropertySource为启动类指定springboot的配置文件,能够做到使用一个main方法启动两个springboot实例,并各自使用不同的配置文件:
1 2 3 4 5 6 7 8 9 10 11 | @SpringBootApplication@PropertySource("classpath:a.properties")@PropertySource(value = "file:a.properties", ignoreResourceNotFound = true)public class Test2Main { /** * @param args */ public static void main(String[] args) { SpringApplication.run(Test2Main.class, args); }} |
也可以使用@PropertySource配置bean,在使用@Component和@ConfigurationProperties时也可给bean指定特定配置文件:
放在resources下的配置文件tom.abc:
mybean.name=Tom
mybean.age=12
bean类ABC,配置tom.abc文件注入:
1 2 3 4 5 6 7 8 9 10 11 12 13 14 15 16 17 18 19 20 21 22 23 24 25 26 27 | package testspringboot.test2;import org.springframework.boot.context.properties.ConfigurationProperties;import org.springframework.context.annotation.PropertySource;import org.springframework.stereotype.Component;@Component@ConfigurationProperties("mybean")@PropertySource(value = "classpath:tom.abc")public class ABC { public String name; public int age; public String getName() { return name; } public void setName(String name) { this.name = name; } public int getAge() { return age; } public void setAge(int age) { this.age = age; } @Override public String toString() { return "ABC [name=" + name + ", age=" + age + "]"; }} |
启动类可以直接获得bean:
1 2 3 4 5 6 7 8 9 10 11 12 13 14 15 16 17 | package testspringboot.test2;import org.springframework.boot.SpringApplication;import org.springframework.boot.autoconfigure.SpringBootApplication;import org.springframework.context.ConfigurableApplicationContext;import org.springframework.context.annotation.PropertySource;@SpringBootApplication@PropertySource("classpath:a.properties")@PropertySource(value = "file:a.properties", ignoreResourceNotFound = true)public class Test2Main { /** * @param args */ public static void main(String[] args) { ConfigurableApplicationContext ctx = SpringApplication.run(Test2Main.class, args); System.out.println(ctx.getBean(ABC.class)); }} |
启动结果:

可以直接获得配置的bean,也可以在代码里使用@Resource或者@Autowired获得;
加载yml文件
如果使用@PropertySource配置yml,则需要自定义一个factory实现:
1 2 3 4 5 6 7 8 9 10 11 12 13 14 15 16 17 18 | package testspringboot.test2;import java.io.IOException;import java.util.Properties;import org.springframework.beans.factory.config.YamlPropertiesFactoryBean;import org.springframework.core.env.PropertiesPropertySource;import org.springframework.core.env.PropertySource;import org.springframework.core.io.support.EncodedResource;import org.springframework.core.io.support.PropertySourceFactory;public class YmlPropertiesFactory implements PropertySourceFactory { @Override public PropertySource> createPropertySource(String name, EncodedResource resource) throws IOException { YamlPropertiesFactoryBean factoryBean = new YamlPropertiesFactoryBean(); factoryBean.setResources(resource.getResource()); factoryBean.afterPropertiesSet(); Properties source = factoryBean.getObject(); return new PropertiesPropertySource("myyml", source); }} |
然后在@PropertySource里配置factory和yml文件:@PropertySource(value = “myapplication.yml”, factory = YmlPropertiesFactory.class),就可以加载yml配置文件了;
到此这篇关于SpringBoot配置文件加载方法详细讲解的文章就介绍到这了,更多相关SpringBoot配置文件内容请搜索IT俱乐部以前的文章或继续浏览下面的相关文章希望大家以后多多支持IT俱乐部!

