一.引言
相信现在有很多小伙伴都已经很熟悉SpringBoot技术了。它大大地简化了Spring应用的开发,极大地提高了项目的开发效率,受到广大开发者和企业的青睐。特别是SpringBoot官方针对各种不同的应用场景,提供了非常丰富的场景启动器(也称为起步依赖)。开发人员只需要在项目的POM文件中导入对应的场景依赖,并编写少量的配置,即可快速实现当前场景的应用开发,真正的实现开箱即用。
今天壹哥会通过这篇文章,并结合一个具体的案例来给各位小伙伴介绍一下,我们该如何自定义一个自己的SpringBoot场景启动器,毕竟有时候官方提供的starter不能完全满足我们所有的需求。同时壹哥也希望通过starter的自定义过程,能够加深大家对SpringBoot自动配置原理的理解。
二. 需求说明
我们先来看一段代码:
package com.qf.hello.service;
import com.qf.hello.bean.HelloProperties;
import org.springframework.beans.factory.annotation.Autowired;

public class HelloService {

    @Autowired
    HelloProperties helloProperties;

    public String sayHello(String name){

        return helloProperties.getPrefix() + ":" +  name + ">>>"  + helloProperties.getSuffix();
    }
}
上面我们定义了一个组件HelloService,它有一个非常简单的功能,就是能够根据调用者传递的名字返回一个打招呼的信息,返回的信息内容可以根据配置的前缀和后缀进行指定格式的设置。我们现在需要将这个功能做成一个Starter,将来在其他项目中可以直接以场景启动器的方式导入并使用。
三. 设计思路
回顾我们之前使用已经做好的starter,你会发现无非就是如下几个步骤:
在POM文件中导入场景依赖;
这个场景依赖中,包含了一个名为xxxAutoConfiguration的自动配置类;
自动配置类按照一定的条件进行相关组件的自动装配;
这些组件又绑定了名为xxxProperties属性配置类;
属性配置类通过指定的前缀,从application.yml配置文件中读取属性的配置信息;
最后在项目中直接使用这些配置好的组件。
我们就参考这个步骤开始进行自定义starter的操作。
四. 实现步骤
1. Step1 业务定义
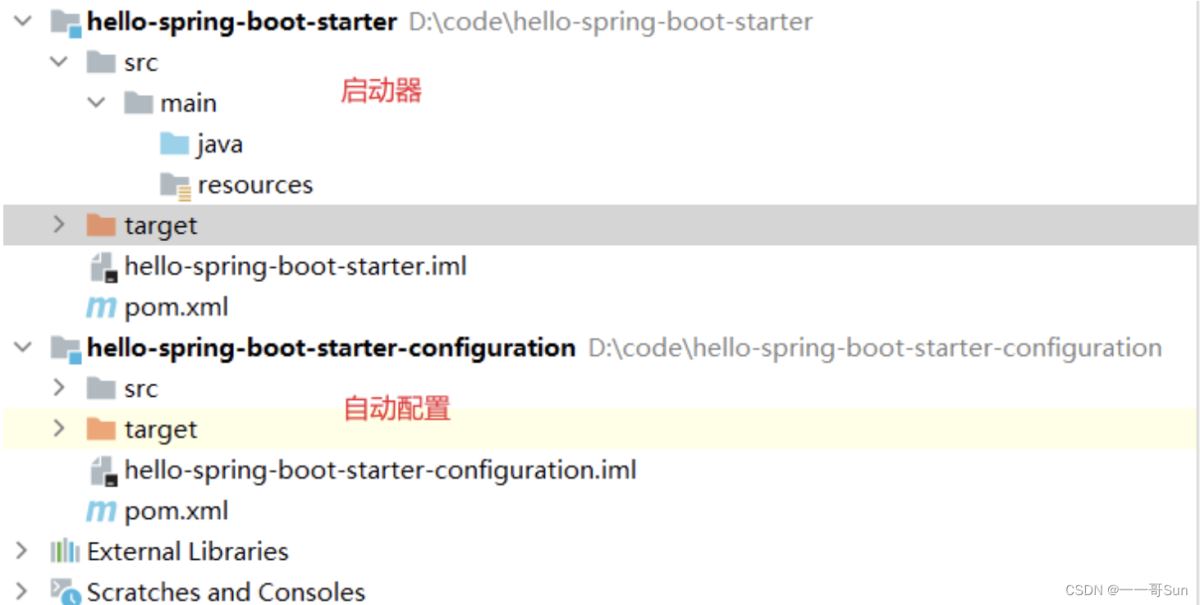
创建一个空项目【customer-starter】,里面包含两个模块:
启动器模块【hello-spring-boot-starter】;
自动配置模块【hello-spring-boot-starter-configuration】

其中启动器项目中无需任何源代码和配置文件,只需要引入自动配置项目的依赖即可。
4.0.0com.qfhello-spring-boot-starterpom1.0-SNAPSHOTcom.qfhello-spring-boot-starter-configuration1.0-SNAPSHOT
自动配置项目必须是一个SpringBoot工程,同时需要引入spring-boot-starter的依赖。
4.0.0org.springframework.bootspring-boot-starter-parent2.4.5com.qfhello-spring-boot-starter-configuration1.0-SNAPSHOTorg.springframework.bootspring-boot-starter
2. Step2 自动配置
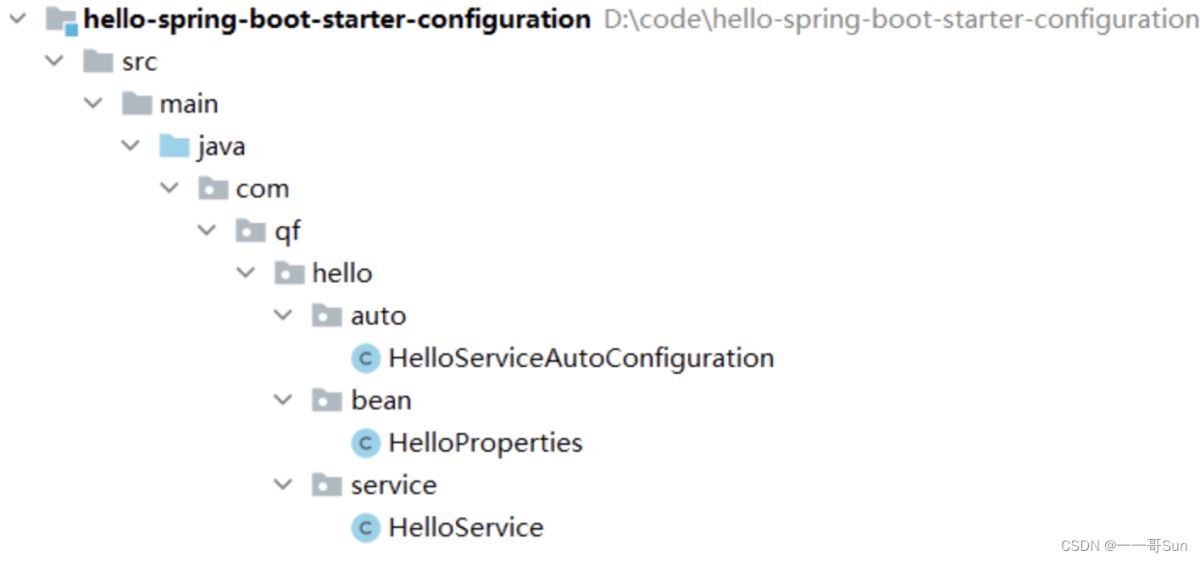
编写自动配置项目中的内容。

HelloService是整个自定义Starter要装配的核心对象,HelloServiceAutoConfiguration是一个配置类,HelloProperties是HelloService组件绑定的属性配置类,他们的代码分别如下:
2.1 HelloService类
//HelloService:该组件不要默认注册到容器中,而是通过一个自动配置类按条件进行装配
package com.qf.hello.service;

import com.qf.hello.bean.HelloProperties;
import org.springframework.beans.factory.annotation.Autowired;

public class HelloService {

    @Autowired
    HelloProperties helloProperties;
    public String sayHello(String name){
        return helloProperties.getPrefix() + ":" +  name + ">>>"  + helloProperties.getSuffix();
    }
}
2.2 HelloProperties类
//HelloProperties:自配配置属性类
package com.qf.hello.bean;

import org.springframework.boot.context.properties.ConfigurationProperties;

@ConfigurationProperties(prefix = "hello")
public class HelloProperties {
    //sayHello方法使用的前缀信息
    private String prefix;
    //sayHello方法使用的后缀信息
    private String suffix;

    public String getPrefix() {
        return prefix;
    }

    public void setPrefix(String prefix) {
        this.prefix = prefix;
    }

    public String getSuffix() {
        return suffix;
    }

    public void setSuffix(String suffix) {
        this.suffix = suffix;
    }
}
2.3 HelloServiceAutoConfiguration类
//自动配置类
package com.qf.hello.auto;

import com.qf.hello.bean.HelloProperties;
import com.qf.hello.service.HelloService;
import org.springframework.boot.autoconfigure.condition.ConditionalOnMissingBean;
import org.springframework.boot.context.properties.EnableConfigurationProperties;
import org.springframework.context.annotation.Bean;
import org.springframework.context.annotation.Configuration;

@Configuration
@EnableConfigurationProperties(HelloProperties.class)
public class HelloServiceAutoConfiguration {

    @ConditionalOnMissingBean(HelloService.class)
    @Bean
    public HelloService helloService(){
        System.out.println("使用自定义starter提供的HelloService");
        return new HelloService();
    }
}
3. Step3 工厂文件
在自动配置项目中的resources目录中,提供一个名称为META-INF的目录,并在该目录下提供一个名为spring.factories的文件。
org.springframework.boot.autoconfigure.EnableAutoConfiguration=
com.qf.hello.auto.HelloServiceAutoConfiguration

spring.factories配置的内容如下:
org.springframework.boot.autoconfigure.EnableAutoConfiguration=
com.qf.hello.auto.HelloServiceAutoConfiguration
4. Step4 安装
将这两个项目clean,并install到本地仓库。
5. Step5 引入使用
创建一个web项目进行自定义starter的使用测试。
5.1 在应用中添加自定义starter依赖坐标
com.qfhello-spring-boot-starter1.0-SNAPSHOT
5.2 编写配置信息
server:
  port: 8080
hello:
  prefix: 千锋
  suffix: 888
5.3 编写测试的Controller
并在该Controller中自动注入自定义场景启动器中的HelloService组件。
package com.qf.boot.controller;

import com.qf.hello.service.HelloService;
import org.springframework.beans.factory.annotation.Autowired;
import org.springframework.web.bind.annotation.GetMapping;
import org.springframework.web.bind.annotation.PathVariable;
import org.springframework.web.bind.annotation.RestController;

@RestController
public class HelloController {

    @Autowired
    HelloService helloService;
    @GetMapping("/hello/{name}")
    public String hello(@PathVariable("name") String name){
        return helloService.sayHello(name);
    }
}
5.4 打开浏览器输入Controller中定义的访问地址

通过测试发现,我们已经可以在其他项目中使用自定义的starter,并使用自动配置好的组件功能了!现在你知道该怎么自定义starter了吗?如果你还有其他问题,可以在评论区留言或私信哦。
到此这篇关于SpringBoot如何自定义starter启动器的文章就介绍到这了,更多相关SpringBoot自定义starter启动器内容请搜索IT俱乐部以前的文章或继续浏览下面的相关文章希望大家以后多多支持IT俱乐部!

