
本文实例为大家分享了jsp实现简单图片验证码的具体代码,供大家参考,具体内容如下
一、实现的功能分析
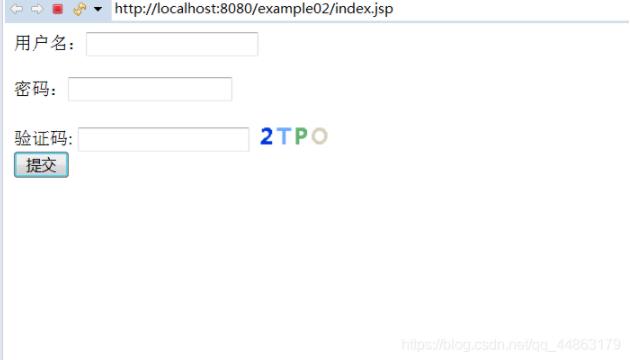
(1)在登陆页面加验证码的功能,起到一定的安全性。在输入正确的验证码,用户名和密码的情况下,才可以实现登录。
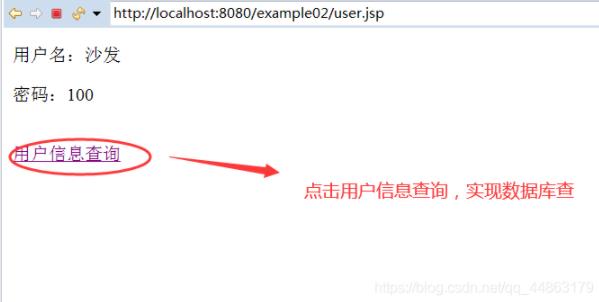
(2)实现查询数据库的功能。在登陆后的页面中,显示用户名和密码,并且设置有一个超链接,实现查询数据库的功能。
(3)代码核心是:随机生成验证码,并且显示在页面上。同时要和输入框中的输入验证码进行校验。
(4)主页面使用img标签的src属性引入验证页面的jsp文件。
(5)验证码的实现页面使用BufferedImage类的方法产生图片。
(6)使用Graphics类的各种方法实现验证码的构成。
二、代码实现
(1)登录页面:index.jsp文件。
1 | <meta charset="utf-8"><title>登录页面</title> |
(2)登录后的页面:user.jsp文件。
1 2 3 4 5 6 7 8 | <meta charset="utf-8"><title>显示登录用户的用户名和密码页面</title>用户名:"+obj.getName()+""); out.print("<p>密码:"+obj.getId()+"</p>"); } else{ response.sendRedirect("index.jsp"); }%><br><a href="AuthorServlet">用户信息查询 </a> |
(3)实现数据查询页面:ueslist.jsp文件。
1 | <meta charset="utf-8"><title>查询信息显示页面</title> |
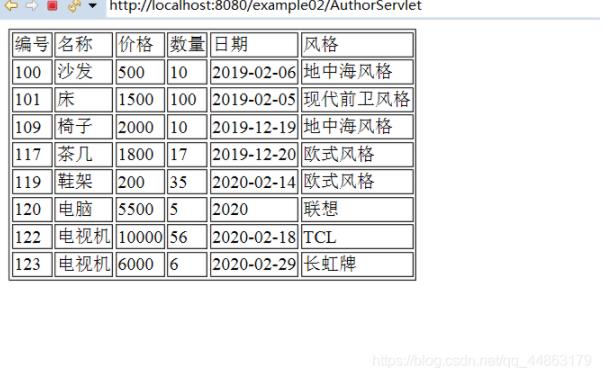
| 编号 | 名称 | 价格 | 数量 | 日期 | 风格 |
| ${author.id} | ${author.name } | ${author.price } | ${author.num } | ${author.dates} | ${author.style} |
(4)定义一个Author类,用于接收数据库中的元素。
1 2 3 4 5 6 7 8 9 10 11 12 13 14 15 16 17 18 19 20 21 22 23 24 25 26 27 28 29 30 31 32 33 34 35 36 37 38 39 40 41 42 43 44 45 46 47 | package com.entity;//用于获取数据库中的元素对象public class Author { private int id; private String name; private int price ; private int num; private String dates; private String style; public int getId() { return id; } public void setId(int id) { this.id = id; } public String getName() { return name; } public void setName(String name) { this.name = name; } public int getPrice() { return price; } public void setPrice(int price) { this.price = price; } public int getNum() { return num; } public void setNum(int num) { this.num = num; } public String getDates() { return dates; } public void setDates(String dates) { this.dates = dates; } public String getStyle() { return style; } public void setStyle(String style) { this.style = style; }} |
(5)登录页面的交互层:LoginServlet.java文件。用于登录检验和验证码匹配。
1 2 3 4 5 6 7 8 9 10 11 12 13 14 15 16 17 18 19 20 21 22 23 24 25 26 27 28 29 30 31 32 33 34 35 36 37 38 39 40 41 42 43 44 45 46 47 48 49 50 51 52 53 54 55 56 57 58 59 60 61 62 63 64 65 66 67 68 69 70 71 72 73 74 75 76 77 78 79 80 81 82 83 84 85 86 87 88 89 90 | //交互层(客户端和服务器的交互)package com.servlet;import java.io.IOException;import java.sql.SQLException;import javax.servlet.ServletException;import javax.servlet.annotation.WebServlet;import javax.servlet.http.HttpServlet;import javax.servlet.http.HttpServletRequest;import javax.servlet.http.HttpServletResponse;import javax.servlet.http.HttpSession;import com.dao.AuthorDao;import com.entity.Author;/** * Servlet implementation class LoginServlet */@WebServlet("/LoginServlet")public class LoginServlet extends HttpServlet { private static final long serialVersionUID = 1L; /** * @see HttpServlet#HttpServlet() */ public LoginServlet() { super(); // TODO Auto-generated constructor stub } /** * @see HttpServlet#doGet(HttpServletRequest request, HttpServletResponse response) */ protected void doGet(HttpServletRequest request, HttpServletResponse response) throws ServletException, IOException { // TODO Auto-generated method stub //内置对象request,response request.setCharacterEncoding("utf-8"); HttpSession session = request.getSession(); //获取用户输入验证码 String checkCode = request.getParameter("checkCode"); //获取session中的验证码,也就是CodeServlet中生成的四个字符 String sessionCode = (String)session.getAttribute("sCode"); //验证码正确 if(checkCode.equals(sessionCode)) { //获取表单数据 String username = request.getParameter("username"); int password = Integer.valueOf(request.getParameter("password")); //判断用户信息是否正确,查询数据库获取用户信息 AuthorDao ad = new AuthorDao(); Author obj = ad.check(username, password); //判断 if(obj != null) { //重新放入用户信息 // HttpSession session = request.getSession(); session.setAttribute("authorInfo", obj); //设置session的有效期为10秒 session.setMaxInactiveInterval(10); //页面转发 response.sendRedirect("user.jsp"); } else { //页面重定向到登录页面 response.sendRedirect("index.jsp"); } } else { //验证码不正确 request.setAttribute("error_code", "验证码不匹配"); request.getRequestDispatcher("index.jsp").forward(request, response); } } /** * @see HttpServlet#doPost(HttpServletRequest request, HttpServletResponse response) */ protected void doPost(HttpServletRequest request, HttpServletResponse response) throws ServletException, IOException { // TODO Auto-generated method stub doGet(request, response); }} |
(6)数据库查询的交互层:AuthorServlet.java文件。
1 2 3 4 5 6 7 8 9 10 11 12 13 14 15 16 17 18 19 20 21 22 23 24 25 26 27 28 29 30 31 32 33 34 35 36 37 38 39 40 41 42 43 44 45 46 47 48 49 50 51 52 53 54 55 56 57 58 | package com.servlet;import java.io.IOException;import java.util.List;import javax.servlet.ServletException;import javax.servlet.annotation.WebServlet;import javax.servlet.http.HttpServlet;import javax.servlet.http.HttpServletRequest;import javax.servlet.http.HttpServletResponse;import com.dao.AuthorDao;import com.entity.Author;/** * Servlet implementation class AuthorServlet */@WebServlet("/AuthorServlet")public class AuthorServlet extends HttpServlet { private static final long serialVersionUID = 1L; /** * @see HttpServlet#HttpServlet() */ public AuthorServlet() { super(); // TODO Auto-generated constructor stub } /** * @see HttpServlet#doGet(HttpServletRequest request, HttpServletResponse response) */ protected void doGet(HttpServletRequest request, HttpServletResponse response) throws ServletException, IOException { // TODO Auto-generated method stub //设置编码方式 request.setCharacterEncoding("utf-8"); //查询用户列表 AuthorDao ad = new AuthorDao(); //将Dao层中的结果放入list中 List<author> list = ad.queryAuthorList(); request.setAttribute("authorList", list); //请求转发的方式将查询结果放入request中,再将超链接直接访问AuthorServlet就将信息显示出来了。 request.getRequestDispatcher("uselist.jsp").forward(request, response); } /** * @see HttpServlet#doPost(HttpServletRequest request, HttpServletResponse response) */ protected void doPost(HttpServletRequest request, HttpServletResponse response) throws ServletException, IOException { // TODO Auto-generated method stub doGet(request, response); }}</author> |
(7)定义一个AuthorDao类实现查询数据库和检验登录的用户名和密码。
1 2 3 4 5 6 7 8 9 10 11 12 13 14 15 16 17 18 19 20 21 22 23 24 25 26 27 28 29 30 31 32 33 34 35 36 37 38 39 40 41 42 43 44 45 46 47 48 49 50 51 52 53 54 55 56 57 58 59 60 61 62 63 64 65 66 67 68 69 70 71 72 73 74 75 76 77 78 79 80 81 82 83 84 85 86 87 88 89 90 91 92 93 94 95 96 97 98 99 100 101 | //用于检验登录页面所填入信息是否正确package com.dao;import java.sql.Connection;import java.sql.PreparedStatement;import java.sql.ResultSet;import java.sql.SQLException;import java.util.ArrayList;import java.util.List;import com.entity.Author;public class AuthorDao { public Author check(String username ,int password) { Author obj = null ; try { DBConnection db = new DBConnection(); //获取数据库连接 Connection conn = db.getConn(); //设置要执行的数据库语句 String sql = "select *from furnitures where name = ? and id = ?"; PreparedStatement ps = conn.prepareStatement(sql); //设置用户名和密码放入sql语句 ps.setString(1, username); ps.setInt(2, password); //执行sql查询语句 , 并将执行结果放入结果集中 ResultSet rs = ps.executeQuery(); //用户名和密码都正确 if(rs.next()) { //新创建一个obj 将查询结果放入 obj = new Author(); obj.setId(rs.getInt(1)); obj.setName(rs.getString(2)); obj.setPrice(rs.getInt(3)); obj.setNum(rs.getInt(4)); obj.setDates(rs.getString(5)); obj.setStyle(rs.getString(6)); } } catch (SQLException e) { // TODO Auto-generated catch block e.printStackTrace(); } return obj; } public List<author> queryAuthorList(){ Author obj = null; //定义一个list集合,用于存放查询结果 List<author> list = new ArrayList<author>() ; try { DBConnection db = new DBConnection(); //获取数据库连接 Connection conn = db.getConn(); //设置数据库要查询的语句 String sql = "select *from furnitures "; PreparedStatement ps = conn.prepareStatement(sql); //执行数据库查询语句,并将查询结果放入结果集 ResultSet rs = ps.executeQuery(); //利用循环将obj放入list集合中 while(rs.next()) { obj = new Author(); obj.setId(rs.getInt(1)); obj.setName(rs.getNString(2)); obj.setPrice(rs.getInt(3)); obj.setNum(rs.getInt(4)); obj.setDates(rs.getString(5)); obj.setStyle(rs.getString(6)); //将obj加入到list list.add(obj); } } catch (SQLException e) { // TODO Auto-generated catch block e.printStackTrace(); } return list; } }</author></author></author> |
(8)定义一个验证码生成CodeServlet类,用于生成验证码。
1 2 3 4 5 6 7 8 9 10 11 12 13 14 15 16 17 18 19 20 21 22 23 24 25 26 27 28 29 30 31 32 33 | package com.servlet;import java.awt.Color;import java.awt.Font;import java.awt.Graphics;import java.awt.image.BufferedImage;import java.io.IOException;import java.util.Random;import javax.imageio.ImageIO;import javax.servlet.ServletException;import javax.servlet.ServletOutputStream;import javax.servlet.annotation.WebServlet;import javax.servlet.http.HttpServlet;import javax.servlet.http.HttpServletRequest;import javax.servlet.http.HttpServletResponse;import javax.servlet.http.HttpSession;@WebServlet("/CodeServlet")public class CodeServlet extends HttpServlet{ //定义验证码的源码 private static final String str ="abcdefghijklmnopqrstuvwxyaABCDEFGHIJKLMNOPQRSTUVWXYZ1234567890"; //定义随机数 private Random random = new Random(); //随机生成四个字符 public String getStr() { String s = ""; int len = str.length(); for(int i=0;i |
(9)创建DBConnectoin.java类用户获取数据库连接。(我用的是mysql)
1 2 3 4 5 6 7 8 9 10 11 12 13 14 15 16 17 18 19 20 21 22 23 24 25 26 27 28 29 30 31 32 33 34 35 36 37 38 39 40 41 | //获取数据库连接package com.dao;import java.sql.Connection;import java.sql.DriverManager;import java.sql.SQLException;public class DBConnection { private static String username="填入自己的数据库名"; private static String password="填入自己的数据库密码"; private static String driver = "com.mysql.jdbc.Driver"; private static String url="jdbc:mysql://localhost:3306/已经创建数据库名"; private Connection conn; static { try { //加载驱动,捕获异常 Class.forName(driver); } catch (ClassNotFoundException e) { // TODO Auto-generated catch block e.printStackTrace(); } } public DBConnection () throws SQLException { //连接数据库 conn = DriverManager.getConnection(url,username,password); } //用于获取conn public Connection getConn() { return conn; } public void setConn(Connection conn) { this.conn = conn; } } |
三、页面
(1)登录页面
(2)数据查询页面
(3)查询结果显示页面
以上就是本文的全部内容,希望对大家的学习有所帮助,也希望大家多多支持IT俱乐部。

