
在日常工作中,我们经常需要将PowerPoint演示文稿转换为图片格式,特别是在需要快速预览或分享时。本文将详细介绍如何使用Python开发一个带有图形界面的PPT批量转图片工具,并深入探讨实现过程中遇到的问题及解决方案。
所有代码
1 2 3 4 5 6 7 8 9 10 11 12 13 14 15 16 17 18 19 20 21 22 23 24 25 26 27 28 29 30 31 32 33 34 35 36 37 38 39 40 41 42 43 44 45 46 47 48 49 50 51 52 53 54 55 56 57 58 59 60 61 62 63 64 65 66 67 68 69 70 71 72 73 74 75 76 77 78 79 80 81 82 83 84 85 86 87 88 89 90 91 92 93 94 95 96 97 98 99 100 101 102 103 104 105 106 107 108 109 110 111 112 113 114 115 116 117 118 119 120 121 122 123 124 125 126 127 128 129 130 131 132 133 134 135 136 137 138 139 140 141 142 143 144 | import wximport osfrom pptx import Presentationfrom PIL import Imageimport iofrom pptx.enum.shapes import MSO_SHAPE_TYPEimport comtypes.clientimport tempfileclass PPTMergerFrame(wx.Frame): def __init__(self): super().__init__(parent=None, title='PPT Merger', size=(400, 300)) self.init_ui() self.Centre() def init_ui(self): panel = wx.Panel(self) vbox = wx.BoxSizer(wx.VERTICAL) # 添加选择文件按钮 self.select_btn = wx.Button(panel, label='选择PPT文件') self.select_btn.Bind(wx.EVT_BUTTON, self.on_select) vbox.Add(self.select_btn, 0, wx.ALL | wx.CENTER, 20) # 添加文件路径显示 self.path_text = wx.TextCtrl(panel, style=wx.TE_READONLY) vbox.Add(self.path_text, 0, wx.ALL | wx.EXPAND, 20) # 添加开始处理按钮 self.process_btn = wx.Button(panel, label='开始处理') self.process_btn.Bind(wx.EVT_BUTTON, self.on_process) self.process_btn.Disable() vbox.Add(self.process_btn, 0, wx.ALL | wx.CENTER, 20) # 添加进度条 self.gauge = wx.Gauge(panel, range=100) vbox.Add(self.gauge, 0, wx.ALL | wx.EXPAND, 20) panel.SetSizer(vbox) def on_select(self, event): wildcard = "PowerPoint files (*.pptx)|*.pptx" with wx.FileDialog(self, "选择PPT文件", wildcard=wildcard, style=wx.FD_OPEN | wx.FD_FILE_MUST_EXIST) as fileDialog: if fileDialog.ShowModal() == wx.ID_CANCEL: return self.ppt_path = fileDialog.GetPath() self.path_text.SetValue(self.ppt_path) self.process_btn.Enable() def convert_pptx_to_pdf(self, input_path, output_path): """将PPTX转换为PDF""" powerpoint = comtypes.client.CreateObject("Powerpoint.Application") powerpoint.Visible = True slides = powerpoint.Presentations.Open(input_path) slides.SaveAs(output_path, 32) # 32 代表 PDF 格式 slides.Close() powerpoint.Quit() def convert_pdf_to_images(self, pdf_path): """将PDF转换为图片列表""" try: import fitz # PyMuPDF except ImportError: wx.MessageBox('请先安装PyMuPDF库:pip install PyMuPDF', '错误') return [] images = [] pdf_document = fitz.open(pdf_path) for page_num in range(pdf_document.page_count): page = pdf_document[page_num] pix = page.get_pixmap(matrix=fitz.Matrix(300/72, 300/72)) # 300 DPI img = Image.frombytes("RGB", [pix.width, pix.height], pix.samples) images.append(img) pdf_document.close() return images def on_process(self, event): try: # 禁用按钮防止重复处理 self.process_btn.Disable() self.select_btn.Disable() # 创建临时PDF文件 temp_pdf = tempfile.mktemp(suffix='.pdf') # 转换PPTX为PDF self.gauge.SetValue(25) self.convert_pptx_to_pdf(self.ppt_path, temp_pdf) # 转换PDF为图片 self.gauge.SetValue(50) images = self.convert_pdf_to_images(temp_pdf) if not images: raise Exception("未能成功转换幻灯片为图片") # 计算合并后图片的尺寸 self.gauge.SetValue(75) total_height = sum(img.size[1] for img in images) max_width = max(img.size[0] for img in images) # 创建新图片 merged_image = Image.new('RGB', (max_width, total_height), 'white') # 垂直拼接图片 y_offset = 0 for img in images: merged_image.paste(img, (0, y_offset)) y_offset += img.size[1] # 保存合并后的图片 save_path = os.path.splitext(self.ppt_path)[0] + '_merged.jpg' merged_image.save(save_path, 'JPEG', quality=95) # 删除临时PDF文件 try: os.remove(temp_pdf) except: pass self.gauge.SetValue(100) # 完成处理 wx.MessageBox(f'处理完成!n保存路径:{save_path}', '成功') except Exception as e: wx.MessageBox(f'处理过程中出现错误:{str(e)}', '错误') finally: # 重置UI状态 self.gauge.SetValue(0) self.process_btn.Enable() self.select_btn.Enable()if __name__ == '__main__': app = wx.App() frame = PPTMergerFrame() frame.Show() app.MainLoop() |
实现过程
1. 图形界面设计
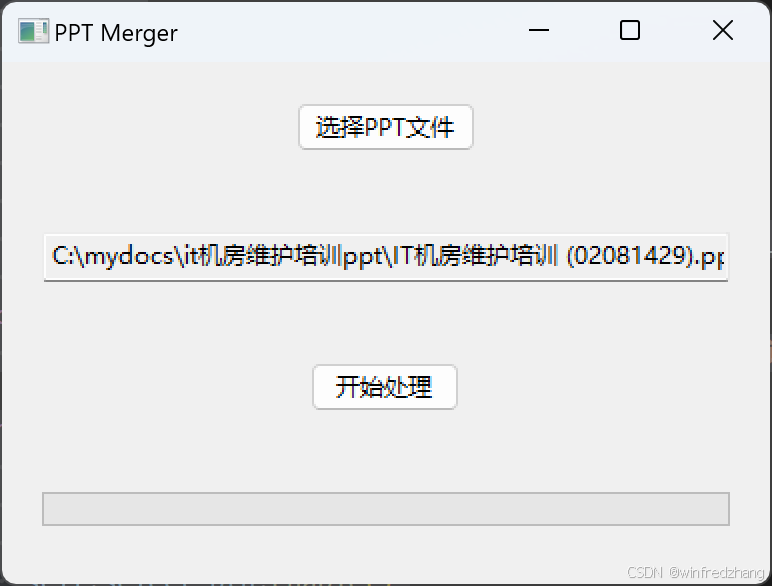
我们使用wxPython创建了一个简洁的界面,包含以下元素:
- 文件选择按钮
- 文件路径显示框
- 处理按钮
- 进度条
2. 核心功能实现
转换过程分为三个主要步骤:
PPT转PDF:
1 2 3 4 5 6 7 | def convert_pptx_to_pdf(self, input_path, output_path): powerpoint = comtypes.client.CreateObject("Powerpoint.Application") powerpoint.Visible = True slides = powerpoint.Presentations.Open(input_path) slides.SaveAs(output_path, 32) # 32 代表 PDF 格式 slides.Close() powerpoint.Quit() |
PDF转图片:
1 2 3 4 5 6 7 8 9 10 11 12 | def convert_pdf_to_images(self, pdf_path): images = [] pdf_document = fitz.open(pdf_path) for page_num in range(pdf_document.page_count): page = pdf_document[page_num] pix = page.get_pixmap(matrix=fitz.Matrix(300/72, 300/72)) img = Image.frombytes("RGB", [pix.width, pix.height], pix.samples) images.append(img) pdf_document.close() return images |
图片合并:
1 2 3 4 5 6 7 8 9 10 11 12 | # 计算合并后图片的尺寸total_height = sum(img.size[1] for img in images)max_width = max(img.size[0] for img in images)# 创建新图片merged_image = Image.new('RGB', (max_width, total_height), 'white')# 垂直拼接图片y_offset = 0for img in images: merged_image.paste(img, (0, y_offset)) y_offset += img.size[1] |
遇到的问题及解决方案
1. PowerPoint权限问题
最初版本直接使用PowerPoint应用程序导出图片时,经常遇到权限错误:
(-2147352567发生意5:(0.Micro50代 PowerPoint slide.Export)
解决方案:
- 改用PDF作为中间格式
- 使用PyMuPDF进行PDF到图片的转换
- 添加错误处理机制
2. 内存管理
处理大型PPT文件时可能出现内存问题,解决方案:
- 使用临时文件管理中间产物
- 及时释放资源
- 逐页处理而不是一次性加载
3. 图片质量
初始版本的图片质量不理想,改进措施:
- 提高PDF转图片的DPI(300DPI)
- 调整JPEG保存质量(quality=95)
- 保持图片原始尺寸
如何使用
安装必要的包:
1 | pip install wxPython python-pptx Pillow PyMuPDF comtypes |
运行程序:
1 2 3 4 5 | if __name__ == '__main__': app = wx.App() frame = PPTMergerFrame() frame.Show() app.MainLoop() |
使用注意事项
确保系统已安装Microsoft PowerPoint
检查文件访问权限
保证足够的磁盘空间
避免文件被其他程序占用
运行结果

以上就是如何使用Python实现PPT批量转图片的详细内容,更多关于Python PPT批量转图片的资料请关注IT俱乐部其它相关文章!

