
介绍
在本文中,我们将使用 OpenCV 库来开发 Python 文档扫描器。
OpenCV 的简要概述: OpenCV 是一个开源库,用于各种计算机语言的图像处理,包括 Python、C++ 等。它可用于检测照片(例如使用人脸检测系统的人脸) 。
要了解更多关于 OpenCV 的信息,你可以在此处参考他们的官方文档:https://pypi.org/project/opencv-python/
我们的软件应该能够正确对齐文档,检测捕获图像的边界,提升文档的质量,并最终提供更好的图像作为输出。本质上,我们将输入一个文档,即用相机拍摄的未经编辑的图像。OpenCV 将处理该图像。
我们的基本工作流程是:
-
形态学运算
-
边缘和轮廓检测
-
识别角点
-
转变视角
执行形态学操作
形态学:是一系列图像处理程序和算法,根据图像的高度和宽度来处理图片。最重要的是它们的大小,而不是它们的相对像素值排序。
1 2 | kernel = np.ones((5,5),np.uint8)img = cv2.morphologyEx(img, cv2.MORPH_CLOSE, kernel, iterations= 3) |
我们可以使用morphologyEx() 函数执行操作。Morphology 中的“close”操作与Erosion相同,在此之前是Dilation过程。
我们将创建一个空白文档,因为在处理边缘时图片里的内容会妨碍你,我们不想冒险删除它们。
从捕获的图像中删除背景
照片中非我们拍摄对象的部分也必须删除。与裁剪图像类似,我们将只专注于维护图像所需的部分。可以使用GrabCut库。
GrabCut 在接收到输入图片及其边界后,剔除边界外的所有元素。
为了利用 GrabCut 来识别背景,我们还可以为用户提供手动设置文档边框的选项。
不过,目前,GrabCut 将能够通过从图像的每个角落取 20 个像素作为背景来自动识别前景。
1 2 3 4 5 6 7 | mask = np.zeros(img.shape[:2],np.uint8)bgdModel = np.zeros((1,65),np.float64)fgdModel = np.zeros((1,65),np.float64)rect = (20,20,img.shape[1]-20,img.shape[0]-20)cv2.grabCut(img,mask,rect,bgdModel,fgdModel,5,cv2.GC_INIT_WITH_RECT)mask2 = np.where((mask==2)|(mask==0),0,1).astype('uint8')img = img*mask2[:,:,np.newaxis] |
这里的“rect”变量表示我们愿意分离的边界。你可能会遇到部分背景进入线条内部的情况,但这是可以接受的。我们的目标是对象的任何部分都不应超出边界。

边缘和轮廓检测
我们目前拥有一份与原始文件大小相同的空白文件。同样,我们将进行边缘检测。我们将为此使用Canny函数。
为了清理文档的噪声,我们还使用了高斯模糊。
(注意:Canny 函数仅适用于灰度图像,因此如果图像尚不存在,则将图像转换为灰度)。
1 2 3 4 5 | gray = cv2.cvtColor(img, cv2.COLOR_BGR2GRAY)gray = cv2.GaussianBlur(gray, (11, 11), 0)# Edge Detection.canny = cv2.Canny(gray, 0, 200)canny = cv2.dilate(canny, cv2.getStructuringElement(cv2.MORPH_ELLIPSE, (5, 5))) |
我们在最后一行放大了图像。
在此之后,我们可以继续进行轮廓检测:
我们只会记录最大的轮廓并在一个新的空白文档上进行交互。
1 2 3 4 5 | gray = cv2.cvtColor(img, cv2.COLOR_BGR2GRAY)gray = cv2.GaussianBlur(gray, (11, 11), 0)# Edge Detection.canny = cv2.Canny(gray, 0, 200)canny = cv2.dilate(canny, cv2.getStructuringElement(cv2.MORPH_ELLIPSE, (5, 5))) |
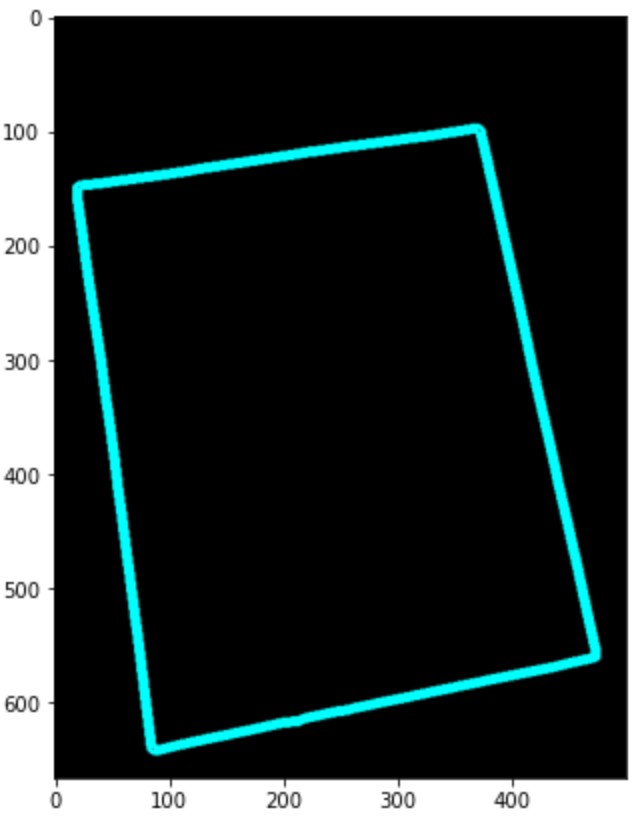
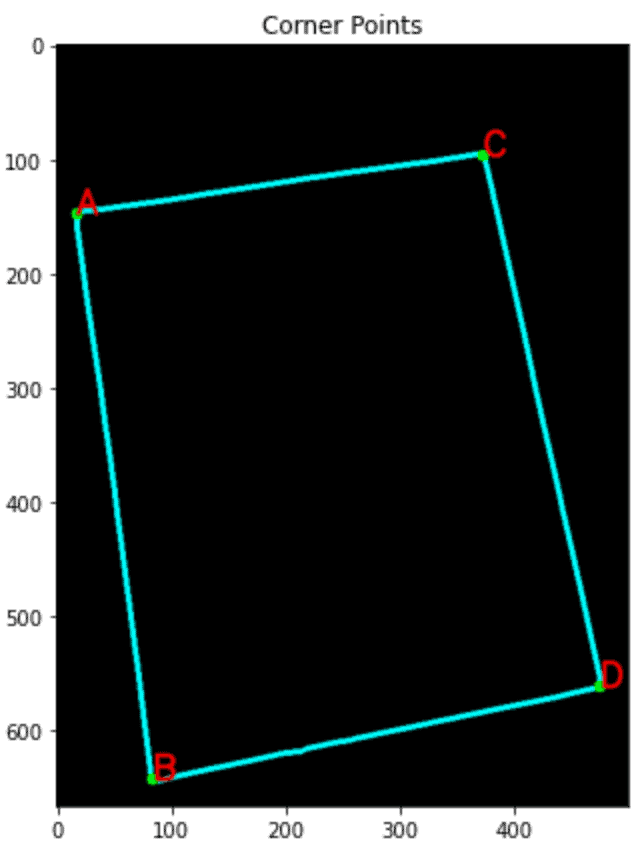
识别角点
我们将使用已经注意到的四个角对齐纸张。使用“ Douglas-Peucker ”方法和approxPolyDp()函数。
1 2 3 4 5 6 7 8 9 10 11 12 13 14 15 | con = np.zeros_like(img)# Loop over the contours.for c in page: # Approximate the contour. epsilon = 0.02 * cv2.arcLength(c, True) corners = cv2.approxPolyDP(c, epsilon, True) # If our approximated contour has four points if len(corners) == 4: breakcv2.drawContours(con, c, -1, (0, 255, 255), 3)cv2.drawContours(con, corners, -1, (0, 255, 0), 10)corners = sorted(np.concatenate(corners).tolist())for index, c in enumerate(corners): character = chr(65 + index) cv2.putText(con, character, tuple(c), cv2.FONT_HERSHEY_SIMPLEX, 1, (255, 0, 0), 1, cv2.LINE_AA) |

标准化四点定位
1 2 3 4 5 6 7 8 9 10 | def order_points(pts): rect = np.zeros((4, 2), dtype='float32') pts = np.array(pts) s = pts.sum(axis=1) rect[0] = pts[np.argmin(s)] rect[2] = pts[np.argmax(s)] diff = np.diff(pts, axis=1) rect[1] = pts[np.argmin(diff)] rect[3] = pts[np.argmax(diff)] return rect.astype('int').tolist() |
寻找目的地坐标:
最后一组坐标可以改变图像的视角。如果从通常的视角以一定角度拍摄,这将很有帮助。
1 2 3 4 5 6 7 8 9 10 11 | (tl, tr, br, bl) = pts# Finding the maximum width.widthA = np.sqrt(((br[0] - bl[0]) ** 2) + ((br[1] - bl[1]) ** 2))widthB = np.sqrt(((tr[0] - tl[0]) ** 2) + ((tr[1] - tl[1]) ** 2))maxWidth = max(int(widthA), int(widthB))# Finding the maximum height. heightA = np.sqrt(((tr[0] - br[0]) ** 2) + ((tr[1] - br[1]) ** 2))heightB = np.sqrt(((tl[0] - bl[0]) ** 2) + ((tl[1] - bl[1]) ** 2))maxHeight = max(int(heightA), int(heightB))# Final destination co-ordinates.destination_corners = [[0, 0], [maxWidth, 0], [maxWidth, maxHeight], [0, maxHeight]] |
透视变换
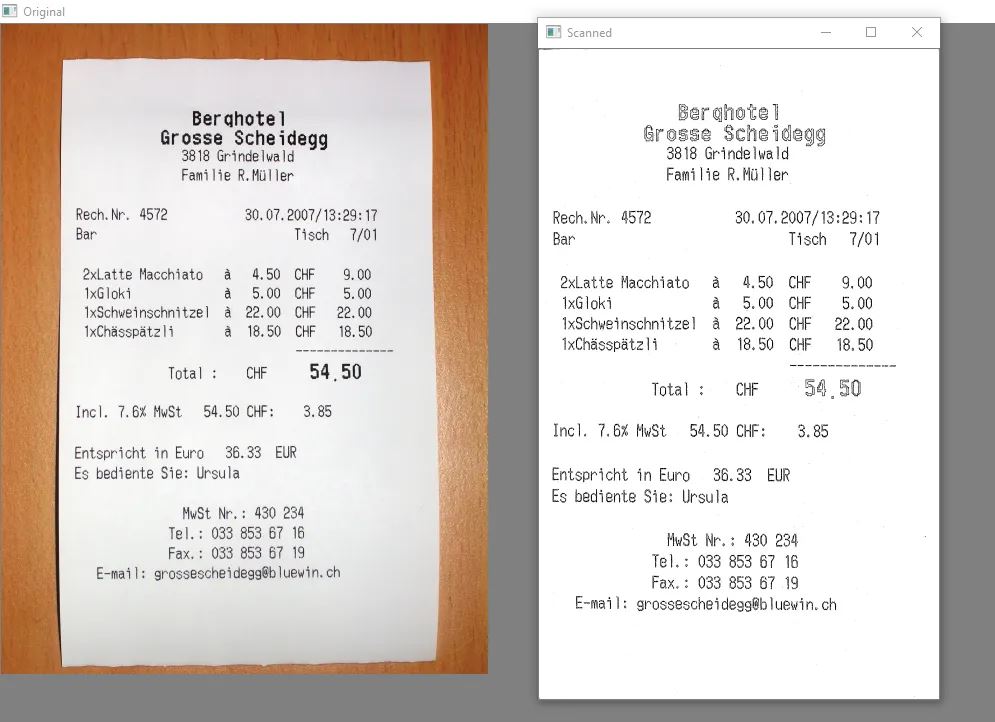
源照片的坐标现在必须与我们事先发现的目标坐标对齐。完成此阶段后,图像看起来就像是从纸张的正上方拍摄的一样。
1 2 3 | # Getting the homography.M = cv2.getPerspectiveTransform(np.float32(corners), np.float32(destination_corners))final = cv2.warpPerspective(orig_img, M, (destination_corners[2][0], destination_corners[2][1]), flags=cv2.INTER_LINEAR) |

现在很明显,以一定角度拍摄的图像现在已经被完美地扫描出来了。
测试观察
已经在许多不同方向的照片上测试了这些代码,你也可以这样做。在每个样例上,它都表现出色。
即使图像的背景是白色(即类似于页面本身颜色的颜色),GrabCut 也有效且清晰地定义了边界线。
结论
本教程教我们如何使用 OpenCV 快速轻松地创建文档扫描仪。
总结:
上传图片后,执行了:
生成与原始文件高度和宽度相同的空白文档的形态学操作
从图像中删除了背景。
检测到图像中的轮廓和边界。
检测到的图像角点,以矩形的形式
变换图像的透视图(如果有)
此文档扫描仪的一些限制: 即使文档的一部分在捕获时位于边界框架之外,该项目也应正常运行。但它也会导致不准确的透视变换。
广泛使用的文档扫描仪应用程序采用了几种深度学习算法,因为它们的结果更加彻底和准确。
到此这篇关于使用OpenCV构建文档扫描仪的文章就介绍到这了,更多相关OpenCV构建文档扫描仪内容请搜索IT俱乐部以前的文章或继续浏览下面的相关文章希望大家以后多多支持IT俱乐部!

