
接口限流
在一个高并发系统中对流量的把控是非常重要的,当巨大的流量直接请求到我们的服务器上没多久就可能造成接口不可用,不处理的话甚至会造成整个应用不可用。为了避免这种情况的发生我们就需要在请求接口时对接口进行限流的操作。
怎么做?
基于springboot而言,我们想到的是通过redis的自加:incr来实现。我们可以通过用户的唯一标识来设计成redis的key,值为单位时间内用户的请求次数。
一、准备工作
创建Spring Boot 工程,引入 Web 和 Redis 依赖,同时考虑到接口限流一般是通过注解来标记,而注解是通过 AOP 来解析的,所以我们还需要加上 AOP 的依赖:
1 | org.springframework.bootspring-boot-starter-data-redisorg.springframework.bootspring-boot-starter-weborg.springframework.bootspring-boot-starter-aop |
提前准备好一个redis示例,并在项目中进行配置。
1 2 3 4 5 6 | #具体配置以实际为主这里只是演示spring: redis: host: localhost port: 6379 password: 123 |
二、创建限流注解
限流我们一般分为两种情况:
1、针对某一个接口单位时间内指定允许访问次数,例如:A接口1分钟内允许访问100次;
2、针对ip地址进行限流,例如:ip地址A可以在1分钟内访问接口50次;
针对这两种情况我们定义一个枚举类:
1 2 3 4 5 6 7 8 9 10 | public enum LimitType { /** * 默认策略 */ DEFAULT, /** * 根据IP进行限流 */ IP} |
接下来定义限流注解:
1 2 3 4 5 6 7 8 9 10 11 12 13 14 15 16 17 18 19 20 21 | @Documented@Target(ElementType.METHOD)@Retention(RetentionPolicy.RUNTIME)public @interface RateLimiter { /** * 限流key */ String key() default "rate_limit:"; /** * 限流时间,单位秒 */ int time() default 60; /** * 限流次数 */ int count() default 50; /** * 限流类型 */ LimitType limitType() default LimitType.DEFAULT;} |
第一个参数 key 是一个前缀,实际使用过程中是这个前缀加上接口方法的完整路径共同来组成一个 key 来存到redis中。使用时在需要进行限流的接口中加上注解并配置详细的参数即可。
三、定制RedisTemplate
在实际使用过程中我们通常是通过RedisTemplate来操作redis的,所以这里就需要定制我们需要的RedisTemplate,默认的RedisTemplate中是有一下小问题的,就是直接使用JdkSerializationRedisSerializer这个工具进行序列化时存放到redis中的key和value是会多一些前缀的,这样就会导致我们在读取数据时可能会出现错误。
修改 RedisTemplate 序列化方案,代码如下:
1 2 3 4 5 6 7 8 9 10 11 12 13 14 15 16 17 18 19 20 21 22 23 | @Bean public RedisTemplate redisTemplate(RedisConnectionFactory factory) { RedisTemplate template = new RedisTemplate(); // 配置连接工厂 template.setConnectionFactory(factory); //使用Jackson2JsonRedisSerializer来序列化和反序列化redis的value值(默认使用JDK的序列化方式) Jackson2JsonRedisSerializer<object data-origwidth="" data-origheight="" style="width: 1264px;"> jacksonSeial = new Jackson2JsonRedisSerializer(Object.class); ObjectMapper om = new ObjectMapper(); // 指定要序列化的域,field,get和set,以及修饰符范围,ANY是都有包括private和public om.setVisibility(PropertyAccessor.ALL, JsonAutoDetect.Visibility.ANY); // 指定序列化输入的类型,类必须是非final修饰的,final修饰的类,比如String,Integer等会跑出异常 om.enableDefaultTyping(ObjectMapper.DefaultTyping.NON_FINAL); jacksonSeial.setObjectMapper(om); // 值采用json序列化 template.setValueSerializer(jacksonSeial); //使用StringRedisSerializer来序列化和反序列化redis的key值 template.setKeySerializer(new StringRedisSerializer()); // 设置hash key 和value序列化模式 template.setHashKeySerializer(new StringRedisSerializer()); template.setHashValueSerializer(jacksonSeial); template.afterPropertiesSet(); return template; }</object> |
四、开发lua脚本
我们在java 代码中将 Lua 脚本定义好,然后发送到 Redis 服务端去执行。我们在 resources 目录下新建 lua 文件夹专门用来存放 lua 脚本,脚本内容如下:
1 2 3 4 5 6 7 8 9 10 11 12 | local key = KEYS[1]local count = tonumber(ARGV[1])local time = tonumber(ARGV[2])local current = redis.call('get', key)if current and tonumber(current) > count then return tonumber(current)endcurrent = redis.call('incr', key)if tonumber(current) == 1 then redis.call('expire', key, time)endreturn tonumber(current) |
KEYS 和 ARGV 都是一会调用时候传进来的参数,tonumber 就是把字符串转为数字,redis.call 就是执行具体的 redis 指令。具体的流程:
- 首先获取到传进来的 key 以及 限流的 count 和时间 time。
- 通过 get 获取到这个 key 对应的值,这个值就是当前时间段内这个接口访问了多少次。
- 如果是第一次访问,此时拿到的结果为 nil,否则拿到的结果应该是一个数字,所以接下来就判断,如果拿到的结果是一个数字,并且这个数字还大于 count,那就说明已经超过流量限制了,那么直接返回查询的结果即可。
- 如果拿到的结果为 nil,说明是第一次访问,此时就给当前 key 自增 1,然后设置一个过期时间。
- 最后把自增 1 后的值返回就可以了。
接下来写一个Bean来加载这个脚本:
1 2 3 4 5 6 7 | @Bean public DefaultRedisScript limitScript() { DefaultRedisScript redisScript = new DefaultRedisScript(); redisScript.setScriptSource(new ResourceScriptSource(new ClassPathResource("lua/limit.lua"))); redisScript.setResultType(Long.class); return redisScript; } |
五、解析注解
自定义切面解析注解:
1 2 3 4 5 6 7 8 9 10 11 12 13 14 15 16 17 18 19 20 21 22 23 24 25 26 27 28 29 30 31 32 33 34 35 36 37 38 39 40 41 42 43 44 45 46 47 48 49 50 51 52 53 54 55 56 57 58 59 60 | @Slf4j@Aspect@Componentpublic class RateLimiterAspect { private final RedisTemplate redisTemplate; private final RedisScript limitScript; public RateLimiterAspect(RedisTemplate redisTemplate, RedisScript limitScript) { this.redisTemplate = redisTemplate; this.limitScript = limitScript; } @Around("@annotation(com.example.demo.annotation.RateLimiter)") public Object doBefore(ProceedingJoinPoint joinPoint) throws Throwable{ MethodSignature methodSignature = (MethodSignature) joinPoint.getSignature(); RateLimiter rateLimiter = methodSignature.getMethod().getAnnotation(RateLimiter.class); //判断该方法是否存在限流的注解 if (null != rateLimiter){ //获得注解中的配置信息 int count = rateLimiter.count(); int time = rateLimiter.time(); String key = rateLimiter.key(); //调用getCombineKey()获得存入redis中的key key -> 注解中配置的key前缀-ip地址-方法路径-方法名 String combineKey = getCombineKey(rateLimiter, methodSignature); log.info("combineKey->,{}",combineKey); //将combineKey放入集合 List<object data-origwidth="" data-origheight="" style="width: 1264px;"> keys = Collections.singletonList(combineKey); log.info("keys->",keys); try { //执行lua脚本获得返回值 Long number = (Long) redisTemplate.execute(limitScript, keys, count, time); //如果返回null或者返回次数大于配置次数,则限制访问 if (number==null || number.intValue() > count) { throw new ServiceException("访问过于频繁,请稍候再试"); } log.info("限制请求'{}',当前请求'{}',缓存key'{}'", count, number.intValue(), combineKey); } catch (ServiceException e) { throw e; } catch (Exception e) { throw new RuntimeException("服务器限流异常,请稍候再试"); } } return joinPoint.proceed(); } /** * Gets combine key. * * @param rateLimiter the rate limiter * @param signature the signature * @return the combine key */ public String getCombineKey(RateLimiter rateLimiter, MethodSignature signature) { StringBuilder stringBuffer = new StringBuilder(rateLimiter.key()); if (rateLimiter.limitType() == LimitType.IP) { stringBuffer.append(RequestUtil.getIpAddr(((ServletRequestAttributes) RequestContextHolder.currentRequestAttributes()).getRequest())).append("-"); } Method method = signature.getMethod(); Class> targetClass = method.getDeclaringClass(); stringBuffer.append(targetClass.getName()).append("-").append(method.getName()); return stringBuffer.toString(); }}</object> |
六、自定义异常处理
由于访问次数达到限制时是抛异常出来,所以我们还需要写一个全局异常捕获:
1 2 3 4 5 6 7 8 9 10 11 12 13 14 15 16 17 18 19 20 21 22 | /** * 自定义ServiceException */public class ServiceException extends Exception{ public ServiceException(){ super(); } public ServiceException(String msg){ super(msg); }}/** * 异常捕获处理 */ @RestControllerAdvicepublic class GlobalExceptionAdvice { @ExceptionHandler(ServiceException.class) public Result<object data-origwidth="" data-origheight="" style="width: 1264px;"> serviceException(ServiceException e) { //Result.failure()是我们在些项目是自定义的统一返回 return Result.failure(e.getMessage()); }}</object> |
七、测试结果
测试代码:
1 2 3 4 5 | @GetMapping("/strategy") @RateLimiter(time = 3,count = 1,limitType = LimitType.IP) public String strategyTest(){ return "test"; } |
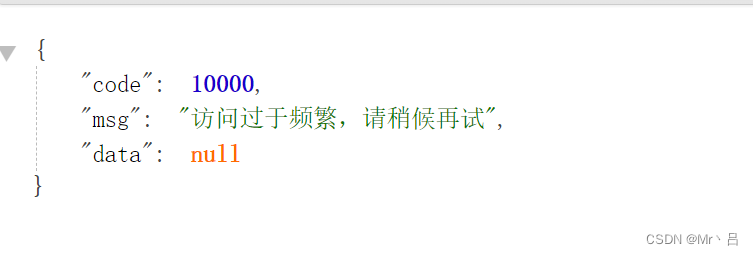
当访问次数大于配置的限制时限制接口调用 ↓
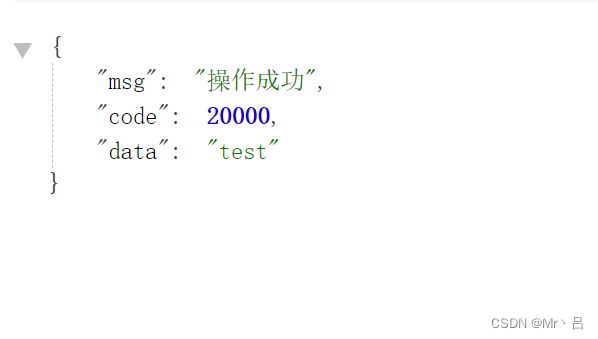
正常结果 ↓
到此这篇关于使用Redis完成接口限流的过程的文章就介绍到这了,更多相关Redis接口限流内容请搜索IT俱乐部以前的文章或继续浏览下面的相关文章希望大家以后多多支持IT俱乐部!

