
1.redis简介
为了提高网站响应速度,企业会将热点数据保存在内存中而不是直接从后端数据库中读取。大型网站应用,热点数据往往巨大,几十G上百G是很正常的事,这种情况下,就需要用到缓存服务器,通过缓存服务器承载大部分用户请求,小部分用户请求交给后端服务器处理,如此一来,就可以大大提高用户访问的速度,提升用户使用体验。
常用的缓存服务器有:
- memcache
- redis
Redis 是一种开源(BSD 许可)内存中数据结构存储,用作数据库、缓存、消息代理和流引擎。
为了实现最佳性能,Redis 使用 内存数据集。根据您的使用案例,Redis 可以通过定期将数据集转储到磁盘或将每个命令附加到基于磁盘的日志来持久保存您的数据。如果您只需要功能丰富的网络内存缓存,您还可以禁用持久性。
Redis 支持异步复制,具有快速非阻塞同步和自动重新连接以及网络分割上的部分重新同步。
2 redis集群
2.1 redis集群分类
集群是一组相互独立、通过高速网络互联的计算机,它们构成了一个组,并以单一系统的模式加以管理。一个客户与集群相互作用时,集群就像是一个独立的服务器。集群配置是用于提高可用性和可缩放性。
redis集群是一个由多个主从节点群组成的分布式服务集群,它具有复制、高可用和分片特性。
redis集群有三种集群模式:
- 主从模式
- 哨兵(Sentinel)模式
- Cluster模式(群集模式)
在服务开发中,单机都会存在单点故障的问题,即服务部署在一台服务器上,一旦服务器宕机服务就不可用,所以为了让服务高可用,分布式服务就出现了,将同一服务部署到多台机器上,即使其中几台服务器宕机,只要有一台服务器可用服务就可用。
redis也是一样,为了解决单机故障引入了主从模式,但主从模式存在一个问题:master节点故障后服务,需要人为的手动将slave节点切换成为maser节点后服务才恢复。redis为解决这一问题又引入了哨兵模式,哨兵模式能在master节点故障后能自动将salve节点提升成master节点,不需要人工干预操作就能恢复服务可用。
但是主从模式、哨兵模式都没有达到真正的数据sharding存储,每个redis实例中存储的都是全量数据,所以redis cluster就诞生了,实现了真正的数据分片存储。
2.2 主从模式
redis单节点虽然有通过RDB和AOF持久化机制能将数据持久化到硬盘上,但数据是存储在一台服务器上的,如果服务器出现硬盘故障等问题,会导致数据不可用,而且读写无法分离,读写都在同一台服务器上,请求量大时会出现I/O瓶颈。
为了避免单点故障 和 读写不分离,Redis 提供了复制(replication)功能实现master数据库中的数据更新后,会自动将更新的数据同步到其他slave数据库上。
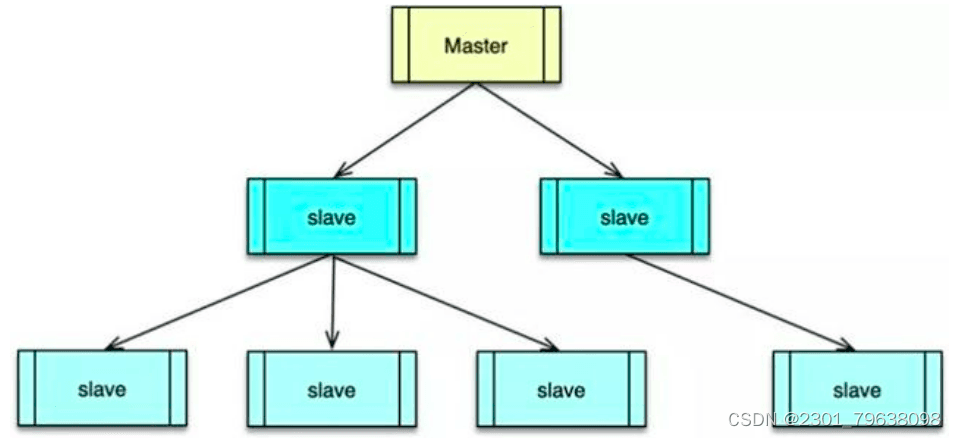
通过数据复制,Redis 的一个 master 可以挂载多个 slave,而 slave 下还可以挂载多个 slave,形成多层嵌套结构。所有写操作都在 master 实例中进行,master 执行完毕后,将写指令分发给挂在自己下面的 slave 节点。slave 节点下如果有嵌套的 slave,会将收到的写指令进一步分发给挂在自己下面的 slave。
通过多个 slave,Redis 的节点数据就可以实现多副本保存,任何一个节点异常都不会导致数据丢失,同时多 slave 可以 N 倍提升读性能。master 只写不读,这样整个 master-slave 组合,读写能力都可以得到大幅提升。
主从模式优缺点:
- 优点: 主从结构具有读写分离,提高效率、数据备份,提供多个副本等优点。
- 不足: 最大的不足就是主从模式不具备自动容错和恢复功能,主节点故障,集群则无法进行工作,可用性比较低,从节点升主节点需要人工手动干预。
普通的主从模式,当主数据库崩溃时,需要手动切换从数据库成为主数据库:
-
在从数据库中使用SLAVE NO ONE命令将从数据库提升成主数据继续服务。
-
启动之前崩溃的主数据库,然后使用SLAVEOF命令将其设置成新的主数据库的从数据库,即可同步数据。
2.3 哨兵模式
主从同步/复制的模式,当主服务器宕机后,需要手动把一台从服务器切换为主服务器,这就需要人工干预,费事费力,还会造成一段时间内服务不可用,这时候就需要哨兵模式登场了。
哨兵模式是从Redis的2.6版本开始提供的,但是当时这个版本的模式是不稳定的,直到Redis的2.8版本以后,这个哨兵模式才稳定下来。
哨兵模式核心还是主从复制,只不过在相对于主从模式在主节点宕机导致不可写的情况下,多了一个竞选机制:从所有的从节点竞选出新的主节点。竞选机制的实现,是依赖于在系统中启动一个sentinel进程。
哨兵本身也有单点故障的问题,所以在一个一主多从的Redis系统中,可以使用多个哨兵进行监控,哨兵不仅会监控主数据库和从数据库,哨兵之间也会相互监控。每一个哨兵都是一个独立的进程,作为进程,它会独立运行。
2.3.1 哨兵模式的作用
监控所有服务器是否正常运行:通过发送命令返回监控服务器的运行状态,除了监控主服务器、从服务器外,哨兵之间也相互监控。
故障切换:当哨兵监测到master宕机,会自动将slave切换成master,然后通过发布订阅模式通知其他的从服务器,修改配置文件,让它们切换master。同时那台有问题的旧主也会变为新主的从,也就是说当旧的主即使恢复时,并不会恢复原来的主身份,而是作为新主的一个从。
2.3.2 哨兵模式优缺点
优点:
哨兵模式是基于主从模式的,解决主从模式中master故障不能自动切换故障的问题。
缺点:
哨兵模式下每台 Redis 服务器都存储相同的数据,很浪费内存空间;数据量太大,主从同步时严重影响了master性能。
哨兵模式是中心化的集群实现方案,每个从机和主机的耦合度很高,master宕机到salve选举master恢复期间服务不可用。因为投票选举结束之前,谁也不知道主机和从机是谁,此时Redis也会开启保护机制,禁止写操作,直到选举出了新的Redis主机。
哨兵模式始终只有一个Redis主机来接收和处理写请求,写操作还是受单机瓶颈影响,没有实现真正的分布式架构。
2.4 Cluster模式
主从模式或哨兵模式每个节点存储的数据都是全量的数据,数据量过大时,就需要对存储的数据进行分片后存储到多个redis实例上。此时就要用到Redis Sharding技术。
redis在3.0上加入了 Cluster 集群模式,实现了 Redis 的分布式存储,也就是说每台 Redis 节点上存储不同的数据。cluster模式为了解决单机Redis容量有限的问题,将数据按一定的规则分配到多台机器,内存/QPS不受限于单机,可受益于分布式集群高扩展性。
Redis Cluster是一种服务器Sharding技术(分片和路由都是在服务端实现),采用多主多从,每一个分区都是由一个Redis主机和多个从机组成,片区和片区之间是相互平行的。Redis Cluster集群采用了P2P的模式,完全去中心化。
官方推荐,集群部署至少要 3 台以上的master节点,最好使用 3 主 3 从六个节点的模式。Redis Cluster集群具有如下几个特点:
- 集群完全去中心化,采用多主多从;所有的redis节点彼此互联(PING-PONG机制),内部使用二进制协议优化传输速度和带宽。
- 客户端与 Redis 节点直连,不需要中间代理层。客户端不需要连接集群所有节点,连接集群中任何一个可用节点即可。
- 每一个分区都是由一个Redis主机和多个从机组成,分片和分片之间是相互平行的。
- 每一个master节点负责维护一部分槽,以及槽所映射的键值数据;集群中每个节点都有全量的槽信息,通过槽每个node都知道具体数据存储到哪个node上。
redis cluster主要是针对海量数据+高并发+高可用的场景,如果你的数据量很大,那么建议就用redis cluster,数据量不是很大时,使用sentinel就够了。redis cluster的性能和高可用性均优于哨兵模式。
Redis Cluster采用虚拟哈希槽分区而非一致性hash算法,预先分配一些卡槽,所有的键根据哈希函数映射到这些槽内,每一个分区内的master节点负责维护一部分槽以及槽所映射的键值数据。
3. 部署redis
由于资源有限,所有redis都在一台主机部署
3.1 redis单机部署
1 2 3 4 5 6 7 8 9 10 11 12 13 14 15 16 17 18 19 20 21 22 23 24 25 26 27 28 29 30 31 32 33 34 35 36 37 38 39 40 41 42 43 44 45 46 47 48 49 50 51 52 53 54 55 56 57 58 59 60 61 62 63 64 65 66 67 68 69 70 71 72 73 74 75 76 77 78 79 80 81 82 83 84 85 86 87 88 89 90 91 92 93 94 | //关闭防火墙和selinux[root@localhost ~]# systemctl disable --now firewalldRemoved "/etc/systemd/system/multi-user.target.wants/firewalld.service".Removed "/etc/systemd/system/dbus-org.fedoraproject.FirewallD1.service".[root@localhost ~]# vi /etc/selinux/config SELINUX=disabled[root@localhost ~]# reboot //重启虚拟机使seLinux保持disabled模式//安装解析软件包,并下载redis[root@localhost ~]# yum -y install wget make gcc gcc-c++[root@localhost ~]# wget https://download.redis.io/redis-stable.tar.gz//解压redis[root@localhost ~]# tar xf redis-stable.tar.gz [root@localhost ~]# cd redis-stable[root@localhost redis-stable]# ls00-RELEASENOTES COPYING MANIFESTO runtest-cluster sentinel.conf utilsBUGS deps README.md runtest-moduleapi srcCODE_OF_CONDUCT.md INSTALL redis.conf runtest-sentinel testsCONTRIBUTING.md Makefile runtest SECURITY.md TLS.md//源码安装redis[root@localhost redis-stable]# make[root@localhost redis-stable]# make install//配置redis[root@localhost redis-stable]# mkdir /etc/redis[root@localhost redis-stable]# cp redis.conf /etc/redis/[root@localhost ~]# echo 'vm.overcommit_memory = 1' >> /etc/sysctl.conf //打开超载提交功能[root@localhost ~]# sysctl -pvm.overcommit_memory = 1[root@localhost ~]# echo never > /sys/kernel/mm/transparent_hugepage/enabled//启动redis[root@localhost ~]# redis-server /etc/redis/redis.conf16905:C 29 Dec 2023 16:11:24.435 * oO0OoO0OoO0Oo Redis is starting oO0OoO0OoO0Oo16905:C 29 Dec 2023 16:11:24.435 * Redis version=7.2.3, bits=64, commit=00000000, modified=0, pid=16905, just started16905:C 29 Dec 2023 16:11:24.435 * Configuration loaded16905:M 29 Dec 2023 16:11:24.436 * Increased maximum number of open files to 10032 (it was originally set to 1024).16905:M 29 Dec 2023 16:11:24.436 * monotonic clock: POSIX clock_gettime _._ _.-``__ ''-._ _.-`` `. `_. ''-._ Redis 7.2.3 (00000000/0) 64 bit .-`` .-```. ```/ _.,_ ''-._ ( ' , .-` | `, ) Running in standalone mode |`-._`-...-` __...-.``-._|'` _.-'| Port: 6379 | `-._ `._ / _.-' | PID: 16905 `-._ `-._ `-./ _.-' _.-' |`-._`-._ `-.__.-' _.-'_.-'| | `-._`-._ _.-'_.-' | https://redis.io `-._ `-._`-.__.-'_.-' _.-' |`-._`-._ `-.__.-' _.-'_.-'| | `-._`-._ _.-'_.-' | `-._ `-._`-.__.-'_.-' _.-' `-._ `-.__.-' _.-' `-._ _.-' `-.__.-' 16905:M 29 Dec 2023 16:11:24.437 * Server initialized16905:M 29 Dec 2023 16:11:24.437 * Ready to accept connections tcp// 能看到大正方体redis单机部署就完成了[root@localhost ~]# ss -anlt //redis单机的默认端口号是6379State Recv-Q Send-Q Local Address:Port Peer Address:Port Process LISTEN 0 511 127.0.0.1:6379 0.0.0.0:* LISTEN 0 128 0.0.0.0:22 0.0.0.0:* LISTEN 0 511 [::1]:6379 [::]:* LISTEN 0 128 [::]:22 [::]:* [root@localhost ~]# redis-cli //使用此命令就能登录到redis127.0.0.1:6379> //修改配置文件/etc/redis/redis.conf使redis在后台运行[root@localhost ~]# vim /etc/redis/redis.conf bind 192.168.50.151daemonize yes //守护模式默认是no改为yesrequirepass password //此句下方可以设置redis的密码[root@localhost ~]# redis-server /etc/redis/redis.conf[root@localhost ~]# ss -anltState Recv-Q Send-Q Local Address:Port Peer Address:Port Process LISTEN 0 511 192.168.50.151:6379 0.0.0.0:* LISTEN 0 128 0.0.0.0:22 0.0.0.0:* LISTEN 0 128 [::]:22 [::]:*[root@localhost ~]# redis-cli -h 192.168.50.151192.168.50.151:6379> //认证192.168.50.151:6379> keys *(error) NOAUTH Authentication required.192.168.50.151:6379> auth passwordOK192.168.50.151:6379> keys *1) "name" |
3.2 redis主从
1 2 3 4 5 6 7 8 9 10 11 12 13 14 15 16 17 18 19 20 21 22 23 24 25 26 27 28 29 30 31 32 33 34 35 36 37 38 39 40 41 42 43 44 45 46 47 48 49 50 51 52 53 54 55 56 57 58 59 60 61 62 63 64 65 66 67 | //修改名称方便分辨,复制配置文件[root@localhost redis]# mv redis.conf 6379.conf[root@localhost redis]# cp 6379.conf 6380.conf[root@localhost redis]# ls6379.conf 6380.conf//修改6380.conf配置文件[root@localhost redis]# vim 6380.conf port 6380pidfile /var/run/redis_6380.pidreplicaof 192.168.50.151 6379 //确定主是什么,这里的主是6379端口masterauth password //在此行下面设置主的密码//启动redis[root@localhost redis]# redis-server /etc/redis/6379.conf[root@localhost redis]# redis-server /etc/redis/6380.conf[root@localhost redis]# ss -anltState Recv-Q Send-Q Local Address:Port Peer Address:Port Process LISTEN 0 511 192.168.50.151:6379 0.0.0.0:* LISTEN 0 511 192.168.50.151:6380 0.0.0.0:* LISTEN 0 128 0.0.0.0:22 0.0.0.0:* LISTEN 0 128 [::]:22 [::]:*//在6379上创建主键,测试是否配置主从复制成功[root@localhost ~]# redis-cli -h 192.168.50.151 -p 6379192.168.50.151:6379> auth passwordOK192.168.50.151:6379> set name tomOK192.168.50.151:6379> set age 20OK192.168.50.151:6379> keys *1) "name"2) "age[root@localhost redis]# redis-cli -h 192.168.50.151 -p 6380192.168.50.151:6380> auth passwordOK192.168.50.151:6380> keys *1) "name"2) "age"192.168.50.151:6380> get name"tom"192.168.50.151:6380> info replication //查看状态# Replicationrole:slave //角色名master_host:192.168.50.151master_port:6379master_link_status:up //连接是否正常,up即为正常master_last_io_seconds_ago:5master_sync_in_progress:0slave_read_repl_offset:631slave_repl_offset:631slave_priority:100slave_read_only:1replica_announced:1connected_slaves:0master_failover_state:no-failovermaster_replid:d8c6a13dde0fe88c70a3b8f71c30acbf73c4c72cmaster_replid2:0000000000000000000000000000000000000000master_repl_offset:631second_repl_offset:-1repl_backlog_active:1repl_backlog_size:1048576repl_backlog_first_byte_offset:15repl_backlog_histlen:617 |
3.3 redis哨兵
1 2 3 4 5 6 7 8 9 10 11 12 13 14 15 16 17 18 19 20 21 22 23 24 25 26 27 28 29 30 31 32 33 34 35 36 37 38 39 40 41 42 43 44 45 46 47 48 49 50 51 52 53 54 55 56 57 58 59 60 61 62 63 64 65 66 67 68 69 70 71 72 73 74 75 76 77 78 79 80 81 82 83 84 85 86 87 88 89 90 91 92 93 94 95 96 97 98 99 100 101 102 103 104 105 106 107 108 109 110 111 112 113 114 115 116 117 118 119 120 121 122 123 124 125 126 127 128 129 130 131 132 133 134 135 136 137 138 139 140 141 142 143 144 145 146 147 148 149 150 151 152 153 154 155 156 157 158 159 160 161 162 163 164 165 166 167 168 169 170 171 172 173 174 175 176 177 178 179 180 181 182 183 184 185 186 187 188 189 190 191 192 193 194 195 196 197 198 199 200 201 202 203 204 205 206 207 208 209 210 211 212 213 214 215 216 217 218 219 220 221 222 223 224 225 226 227 228 229 230 231 232 233 234 235 236 237 238 239 240 241 242 243 244 245 246 | //停止先前的进程[root@localhost redis]# pkill redis//复制文件[root@localhost redis]# cp 6379.conf 6380.conf[root@localhost redis]# cp 6379.conf 6381.conf//配置6380文件[root@localhost redis]# vim 6380.confport 6380pidfile /var/run/redis_6380.pidlogfile "/var/log/redis6380.log"//配置6381文件[root@localhost redis]# vim 6381.conf:%s/6379/6381/g //修改所有的6379为6380//复制文件[root@localhost redis]# cp 6379.conf 6389.conf[root@localhost redis]# cp 6380.conf 6390.conf[root@localhost redis]# cp 6381.conf 6391.conf//配置6389文件[root@localhost redis]# vim 6389.conf:%s/6379/6389/g //末行模式下执行replicaof 192.168.50.151 //添加以下参数,确认主和主的密码masterauth password//配置6390文件[root@localhost redis]# vim 6390.conf:%s/6380/6390/g //修改所有的6380为6390replicaof 192.168.50.151 6380 //添加以下参数,确认主和主的密码masterauth password//配置6391文件[root@localhost redis]# vim 6391.conf:%s/6381/6391/greplicaof 192.168.50.151 6381masterauth password//复制哨兵文件到/etc/redis/下[root@localhost ~]# cp redis-stable/sentinel.conf /etc/redis/[root@localhost ~]# cd /etc/redis///配置哨兵要监控的节点,[root@localhost redis]# vim sentinel.confdaemonize yes //默认是no改为yespidfile /var/run/redis-sentinel1.pid# The valid charset is A-z 0-9 and the three characters ".-_".sentinel monitor mymaster1 192.168.50.151 6379 2sentinel monitor mymaster2 192.168.50.151 6380 2sentinel monitor mymaster3 192.168.50.151 6381 2sentinel monitor myslave1 192.168.50.151 6389 2sentinel monitor myslave2 192.168.50.151 6390 2sentinel monitor myslave3 192.168.50.151 6391 2sentinel monitor mysentinel1 192.168.50.151 26380 2sentinel monitor mysentinel2 192.168.50.151 26381 2# sentinel auth-pass mymaster MySUPER--secret-0123passw0rdsentinel auth-pass mymaster1 passwordsentinel auth-pass mymaster2 passwordsentinel auth-pass mymaster3 passwordsentinel auth-pass myslave1 passwordsentinel auth-pass myslave2 passwordsentinel auth-pass myslave3 passwordsentinel auth-pass mysentinel1 passwordsentinel auth-pass mysentinel2 password# Default is 30 seconds.sentinel down-after-milliseconds mymaster1 30000sentinel down-after-milliseconds mymaster2 30000sentinel down-after-milliseconds mymaster3 30000sentinel down-after-milliseconds myslave1 30000sentinel down-after-milliseconds myslave2 30000sentinel down-after-milliseconds myslave3 30000sentinel down-after-milliseconds mysentinel1 30000sentinel down-after-milliseconds mysentinel2 30000# time while performing the synchronization with the master.sentinel parallel-syncs mymaster1 1sentinel parallel-syncs mymaster2 1sentinel parallel-syncs mymaster3 1sentinel parallel-syncs myslave1 1sentinel parallel-syncs myslave2 1sentinel parallel-syncs myslave3 1sentinel parallel-syncs mysentinel1 1sentinel parallel-syncs mysentinel2 1# Default is 3 minutes.sentinel failover-timeout mymaster1 180000sentinel failover-timeout mymaster2 180000sentinel failover-timeout mymaster3 180000sentinel failover-timeout myslave1 180000sentinel failover-timeout myslave2 180000sentinel failover-timeout myslave3 180000sentinel failover-timeout mysentinel1 180000sentinel failover-timeout mysentinel2 180000#最后一行SENTINEL master-reboot-down-after-period mymaster1 0SENTINEL master-reboot-down-after-period mymaster2 0SENTINEL master-reboot-down-after-period mymaster3 0SENTINEL master-reboot-down-after-period myslave1 0SENTINEL master-reboot-down-after-period myslave2 0SENTINEL master-reboot-down-after-period myslave3 0SENTINEL master-reboot-down-after-period mysentinel1 0SENTINEL master-reboot-down-after-period mysentinel2 0//修改哨兵文件名字,方便分辨[root@localhost redis]# mv sentinel.conf sentinel26379.conf//复制哨兵文件[root@localhost redis]# cp sentinel26379.conf sentinel26380.conf[root@localhost redis]# cp sentinel26379.conf sentinel26381.conf//配置哨兵26380文件[root@localhost redis]# vim sentinel26380.confport 26380 //修改为26380pidfile /var/run/redis-sentinel2.pid//配置哨兵26381文件[root@localhost redis]# vim sentinel26381.confport 26381pidfile /var/run/redis-sentinel3.pid//启动所有的节点[root@localhost redis]# redis-server /etc/redis/6379.conf[root@localhost redis]# redis-server /etc/redis/6380.conf[root@localhost redis]# redis-server /etc/redis/6381.conf[root@localhost redis]# redis-server /etc/redis/6389.conf[root@localhost redis]# redis-server /etc/redis/6390.conf[root@localhost redis]# redis-server /etc/redis/6391.conf[root@localhost redis]# redis-sentinel /etc/redis/sentinel26379.conf [root@localhost redis]# redis-sentinel /etc/redis/sentinel26380.conf [root@localhost redis]# redis-sentinel /etc/redis/sentinel26381.conf //查看进程[root@localhost ~]# ps -ef | grep redisroot 1468 1 0 16:10 ? 00:00:00 redis-server 192.168.50.151:6379root 1475 1 0 16:10 ? 00:00:00 redis-server 192.168.50.151:6380root 1483 1 0 16:10 ? 00:00:00 redis-server 192.168.50.151:6381root 1490 1 0 16:10 ? 00:00:00 redis-server 192.168.50.151:6389root 1498 1 0 16:10 ? 00:00:00 redis-server 192.168.50.151:6390root 1505 1 0 16:10 ? 00:00:00 redis-server 192.168.50.151:6391root 1512 1 0 16:10 ? 00:00:00 redis-sentinel *:26379 [sentinel]root 1518 1 0 16:11 ? 00:00:00 redis-sentinel *:26380 [sentinel]root 1524 1 0 16:11 ? 00:00:00 redis-sentinel *:26381 [sentinel]root 1530 1385 0 16:11 pts/0 00:00:00 grep --color=auto redis//查看所有主节点以及对应的从节点[root@localhost ~]# redis-cli -h 192.168.50.151 -p 6379192.168.50.151:6379> auth passwordOK192.168.50.151:6379> info replication# Replicationrole:masterconnected_slaves:1slave0:ip=192.168.50.151,port=6389,state=online,offset=24713,lag=0[root@localhost ~]# redis-cli -h 192.168.50.151 -p 6389192.168.50.151:6389> auth passwordOK192.168.50.151:6389> info replication192.168.50.151:6389> info replication# Replicationrole:slavemaster_host:192.168.50.151master_port:6379master_link_status:upmaster_last_io_seconds_ago:0master_sync_in_progress:0slave_read_repl_offset:16593slave_repl_offset:16593slave_priority:100slave_read_only:1replica_announced:1connected_slaves:0master_failover_state:no-failovermaster_replid:cd01e2131197e4e1eb2d40c4c4d40c33de7f2784master_replid2:d8c6a13dde0fe88c70a3b8f71c30acbf73c4c72cmaster_repl_offset:16593second_repl_offset:15repl_backlog_active:1repl_backlog_size:1048576repl_backlog_first_byte_offset:15repl_backlog_histlen:16579//测试主节点故障后会不会自动切换[root@localhost ~]# ps -ef | grep redisroot 1468 1 0 16:10 ? 00:00:00 redis-server 192.168.50.151:6379root 1475 1 0 16:10 ? 00:00:00 redis-server 192.168.50.151:6380root 1483 1 0 16:10 ? 00:00:00 redis-server 192.168.50.151:6381root 1490 1 0 16:10 ? 00:00:00 redis-server 192.168.50.151:6389root 1498 1 0 16:10 ? 00:00:00 redis-server 192.168.50.151:6390root 1505 1 0 16:10 ? 00:00:00 redis-server 192.168.50.151:6391root 1512 1 0 16:10 ? 00:00:00 redis-sentinel *:26379 [sentinel]root 1518 1 0 16:11 ? 00:00:00 redis-sentinel *:26380 [sentinel]root 1524 1 0 16:11 ? 00:00:00 redis-sentinel *:26381 [sentinel]root 1563 1535 0 16:14 pts/1 00:00:00 grep --color=auto redis[root@localhost ~]# kill -9 1468[root@localhost ~]# redis-cli -h 192.168.50.151 -p 6389192.168.50.151:6389> auth passwordOK192.168.50.151:6389> info replication# Replicationrole:masterconnected_slaves:0master_failover_state:no-failovermaster_replid:e0327b0641a64e6dab20b141ab4cf21e4d5434e2master_replid2:cd01e2131197e4e1eb2d40c4c4d40c33de7f2784master_repl_offset:122588second_repl_offset:81238repl_backlog_active:1repl_backlog_size:1048576repl_backlog_first_byte_offset:15repl_backlog_histlen:122574//重启节点看是否变为从节点以及对应的主节点[root@localhost ~]# redis-server /etc/redis/6379.conf[root@localhost ~]# redis-cli -h 192.168.50.151 -p 6379192.168.50.151:6379> auth passwordOK192.168.50.151:6379> info replication# Replicationrole:slavemaster_host:192.168.50.151master_port:6389master_link_status:downmaster_last_io_seconds_ago:-1master_sync_in_progress:0slave_read_repl_offset:0slave_repl_offset:0master_link_down_since_seconds:-1slave_priority:100slave_read_only:1replica_announced:1connected_slaves:0master_failover_state:no-failovermaster_replid:40fef959403624aa384f742eadbe6e4ea85773bbmaster_replid2:0000000000000000000000000000000000000000master_repl_offset:0second_repl_offset:-1repl_backlog_active:0repl_backlog_size:1048576repl_backlog_first_byte_offset:0repl_backlog_histlen:0 |
3.4 Cluster模式
1 2 3 4 5 6 7 8 9 10 11 12 13 14 15 16 17 18 19 20 21 22 23 24 25 26 27 28 29 30 31 32 33 34 35 36 37 38 39 40 41 42 43 44 45 46 47 48 49 50 51 52 53 54 55 56 57 58 59 60 61 62 63 64 65 66 67 68 69 70 71 72 73 74 75 76 77 78 79 80 81 82 83 84 85 86 87 88 89 90 91 92 93 94 95 96 97 98 99 100 101 102 103 104 105 106 107 108 109 110 111 112 113 114 115 116 117 118 119 120 121 122 123 124 125 126 127 128 129 130 131 132 133 134 135 136 137 138 139 140 141 142 143 144 145 146 147 148 149 150 151 152 153 154 155 156 157 158 159 160 161 162 163 | //配置Cluster模式下的6379[root@localhost redis]# vim 6379.confport 6379 //端口号logfile "/var/log/redis-6379.log" //认证文件daemonize yes //保护模式(在后台启动)cluster-enabled yes (开启Cluster模式)cluster-config-file nodes-6379.conf //Cluster配置文件luster-node-timeout 15000 //超时间appendonly yes//配置Cluster模式下的6380[root@localhost redis]# cp 6379.conf 6380.conf[root@localhost redis]# vim 6380.conf%s/6379/6380/g//配置Cluster模式下的6389、6390、6391[root@localhost redis]# cp 6379.conf 6381.conf[root@localhost redis]# vim 6381.conf%s/6379/6381/g//配置Cluster模式下的6389、6390、6391[root@localhost redis]# cp 6379.conf 6389.conf[root@localhost redis]# sed -i 's/6379/6389/g' 6389.conf [root@localhost redis]# cp 6379.conf 6390.conf[root@localhost redis]# sed -i 's/6379/6390/g' 6390.conf [root@localhost redis]# cp 6379.conf 6391.conf[root@localhost redis]# sed -i 's/6379/6391/g' 6391.conf//配置redis开机自启[root@localhost ~]# vim /usr/bin/redis-daemon#!/bin/bash/usr/local/bin/redis-server /etc/redis/6379.conf/usr/local/bin/redis-server /etc/redis/6380.conf/usr/local/bin/redis-server /etc/redis/6381.conf/usr/local/bin/redis-server /etc/redis/6389.conf/usr/local/bin/redis-server /etc/redis/6390.conf/usr/local/bin/redis-server /etc/redis/6391.conf//此脚本可以一次性启动多个服务端口[root@localhost ~]# chmod +x /usr/bin/redis-daemon[root@localhost ~]# cp /usr/lib/systemd/system/sshd.service /usr/lib/systemd/system/redis-daemon.service[root@localhost ~]# vim /usr/lib/systemd/system/redis-daemon.service[Unit]Description=redis replication server daemonAfter=network.target [Service]Type=forkingExecStart=/usr/bin/redis-daemonExecStop=/usr/bin/pkill redisExecReload=/bin/kill -HUP $MAINPID[Install]WantedBy=multi-user.target[root@localhost redis]# systemctl enable --now redisCreated symlink /etc/systemd/system/multi-user.target.wants/redis.service → /usr/lib/systemd/system/redis.service.[root@localhost redis]# ss -anltState Recv-Q Send-Q Local Address:Port Peer Address:Port Process LISTEN 0 511 127.0.0.1:16389 0.0.0.0:* LISTEN 0 511 127.0.0.1:16390 0.0.0.0:* LISTEN 0 511 127.0.0.1:16391 0.0.0.0:* LISTEN 0 511 127.0.0.1:6379 0.0.0.0:* LISTEN 0 511 127.0.0.1:6380 0.0.0.0:* LISTEN 0 511 127.0.0.1:6381 0.0.0.0:* LISTEN 0 511 127.0.0.1:6389 0.0.0.0:* LISTEN 0 511 127.0.0.1:6390 0.0.0.0:* LISTEN 0 128 0.0.0.0:22 0.0.0.0:* LISTEN 0 511 127.0.0.1:6391 0.0.0.0:* LISTEN 0 511 127.0.0.1:16379 0.0.0.0:* LISTEN 0 511 127.0.0.1:16380 0.0.0.0:* LISTEN 0 511 127.0.0.1:16381 0.0.0.0:* LISTEN 0 511 [::1]:16389 [::]:* LISTEN 0 511 [::1]:16390 [::]:* LISTEN 0 511 [::1]:16391 [::]:* LISTEN 0 511 [::1]:6379 [::]:* LISTEN 0 511 [::1]:6380 [::]:* LISTEN 0 511 [::1]:6381 [::]:* LISTEN 0 511 [::1]:6389 [::]:* LISTEN 0 511 [::1]:6390 [::]:* LISTEN 0 128 [::]:22 [::]:* LISTEN 0 511 [::1]:6391 [::]:* LISTEN 0 511 [::1]:16379 [::]:* LISTEN 0 511 [::1]:16380 [::]:* LISTEN 0 511 [::1]:16381 [::]:*//查看日志[root@localhost log]# tail -100f redis-6379.log20114:M 02 Jan 2024 15:05:17.373 * No cluster configuration found, I'm f33525126ab16bfa8c9056d19f9c3634aa3db08a//创建集群[root@localhost ~]# redis-cli --cluster create 127.0.0.1:6379 127.0.0.1:6380 127.0.0.1:6381 127.0.0.1:6389 127.0.0.1:6390 127.0.0.1:6391 --cluster-replicas 1Adding replica 127.0.0.1:6391 to 127.0.0.1:6379Adding replica 127.0.0.1:6389 to 127.0.0.1:6380Adding replica 127.0.0.1:6390 to 127.0.0.1:6381Can I set the above configuration? (type 'yes' to accept): yes[OK] All nodes agree about slots configuration.>>> Check for open slots...>>> Check slots coverage...[OK] All 16384 slots covered.//测试[root@localhost ~]# redis-cli -h 127.0.0.1 -p 6380127.0.0.1:6380> set name tomOK127.0.0.1:6380> get name"tom"[root@localhost ~]# redis-cli -h 127.0.0.1 -p 6389127.0.0.1:6389> keys *1) "name"127.0.0.1:6379> cluster nodes //查看节点信息[root@localhost~]#: yum -y install ruby[root@localhost ~]#: vim example.rbrequire './cluster' if ARGV.length != 2 startup_nodes = [ {:host => "127.0.0.1", :port => 6379}, {:host => "127.0.0.1", :port => 6380} ] else startup_nodes = [ {:host => ARGV[0], :port => ARGV[1].to_i} ] end rc = RedisCluster.new(startup_nodes,32,:timeout => 0.1) last = false while not last begin last = rc.get("__last__") last = 0 if !last rescue => e puts "error #{e.to_s}" sleep 1 end end ((last.to_i+1)..1000000000).each{|x| begin rc.set("foo#{x}",x) puts rc.get("foo#{x}") rc.set("__last__",x) rescue => e puts "error #{e.to_s}" end sleep 0.1 }[root@localhost ~]#: redis-cli -h 127.0.0.1 -p 6379 -c127.0.0.1:6379> keys * //可修改不同节点的事务1) "age"[root@localhost ~]#: redis-cli -h 127.0.0.1 -p 6380 -c127.0.0.1:6380> get age-> Redirected to slot [741] located at 127.0.0.1:6379"20" |
到此这篇关于Rocky9部署redis的实现示例的文章就介绍到这了,更多相关Rocky9部署redis内容请搜索IT俱乐部以前的文章或继续浏览下面的相关文章希望大家以后多多支持IT俱乐部!

