
1 Redisson
1.1 简介
Redisson 顾名思义,Redis 的儿子,本质上还是 Redis 加锁,不过是对 Redis 做了很多封装,它不仅提供了一系列的分布式的 Java 常用对象,还提供了许多分布式服务。
1.2 与其他客户端比较
Redisson和Jedis、Lettuce有什么区别?
-
Redisson和它俩的区别就像一个用鼠标操作图形化界面,一个用命令行操作文件。Redisson是更高层的抽象,Jedis和Lettuce是Redis命令的封装。 -
Jedis是Redis官方推出的用于通过Java连接Redis客户端的一个工具包,提供了Redis的各种命令支持 -
Lettuce是一种可扩展的线程安全的Redis客户端,通讯框架基于Netty,支持高级的Redis特性,比如哨兵,集群,管道,自动重新连接和Redis数据模型。Spring Boot 2.x开始Lettuce已取代Jedis成为首选Redis的客户端。 -
Redisson是架设在Redis基础上,通讯基于Netty的综合的、新型的中间件,企业级开发中使用Redis的最佳范本 -
Jedis把Redis命令封装好,Lettuce则进一步有了更丰富的Api,也支持集群等模式。但是两者只给了你操作Redis数据库的脚手架,而Redisson则是基于Redis、Lua和Netty建立起了成熟的分布式解决方案,甚至redis官方都推荐的一种工具集
1.3 操作使用
1.3.1 pom.xml
在引入 Redisson 的依赖后,就可以直接进行调用:
1 | org.redissonredisson3.13.4org.redissonredisson-spring-boot-starter3.13.6 |
1.3.2 配置
1 2 3 4 5 6 7 8 9 10 11 12 13 14 15 16 17 | @Configurationpublic class RedissionConfig { @Value("${spring.redis.host}") private String redisHost; @Value("${spring.redis.password}") private String password; private int port = 6379; @Bean public RedissonClient getRedisson() { Config config = new Config(); config.useSingleServer(). setAddress("redis://" + redisHost + ":" + port). setPassword(password); config.setCodec(new JsonJacksonCodec()); return Redisson.create(config); }} |
1.3.3 启用分布式锁
1 2 3 4 5 6 7 8 9 10 11 | @Resourceprivate RedissonClient redissonClient;RLock rLock = redissonClient.getLock(lockName);try { boolean isLocked = rLock.tryLock(expireTime, TimeUnit.MILLISECONDS); if (isLocked) { // TODO } } catch (Exception e) { rLock.unlock(); } |
简洁明了,只需要一个RLock,既然推荐Redisson,就往里面看看他是怎么实现的。
就是这么简单,使用方法 jdk 的 ReentrantLock 差不多,并且也支持 ReadWriteLock(读写锁)、Reentrant Lock(可重入锁)、Fair Lock(公平锁)、RedLock(红锁)等各种锁,详细可以参照redisson官方文档来查看。
那么 Redisson 到底有哪些优势呢?锁的自动续期(默认都是 30 秒),如果业务超长,运行期间会自动给锁续上新的 30s,不用担心业务执行时间超长而锁被自动删掉。
加锁的业务只要运行完成,就不会给当前续期,即便不手动解锁,锁默认在 30s 后删除,不会造成死锁问题。
前面也提到了锁的自动续期,我们来看看 Redisson 是如何来实现的。
1.4 大致操作原理
我们一起来看下Redisson底层原理图吧:
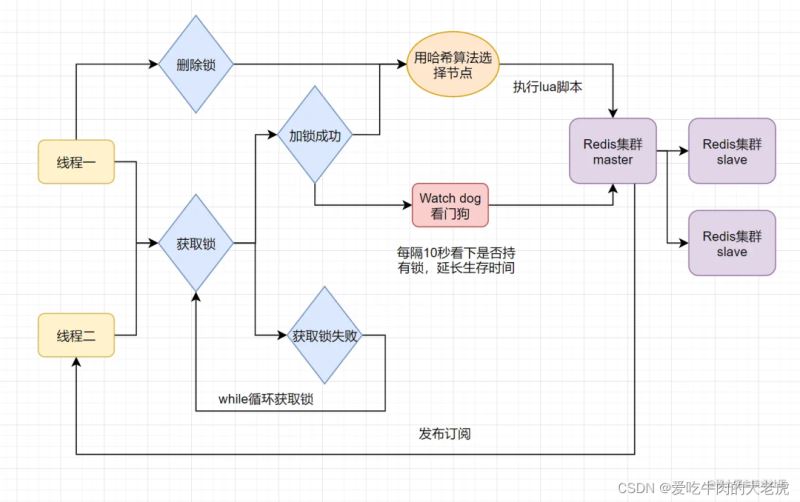
只要线程一加锁成功,就会启动一个watch dog看门狗,它是一个后台线程,会每隔10秒检查一下,如果线程一还持有锁,那么就会不断的延长锁key的生存时间。因此,Redisson就是使用Redisson解决了锁过期释放,业务没执行完问题。
1.5 RLock
RLock是Redisson分布式锁的最核心接口,继承了concurrent包的Lock接口和自己的RLockAsync接口,RLockAsync的返回值都是RFuture,是Redisson执行异步实现的核心逻辑,也是Netty发挥的主要阵地。
1.5.1 RLock如何加锁
从RLock进入,找到RedissonLock类,找到 tryLock 方法再递进到干活的tryAcquireOnceAsync 方法,这是加锁的主要代码(版本不一此处实现有差别,和最新3.15.x有一定出入,但是核心逻辑依然未变。此处以3.13.6为例)
1 2 3 4 5 6 7 8 9 10 11 12 13 14 15 | private RFuture tryAcquireOnceAsync(long waitTime, long leaseTime, TimeUnit unit, long threadId) { if (leaseTime != -1L) { return this.tryLockInnerAsync(waitTime, leaseTime, unit, threadId, RedisCommands.EVAL_NULL_BOOLEAN); } else { RFuture ttlRemainingFuture = this.tryLockInnerAsync(waitTime, this.commandExecutor.getConnectionManager().getCfg().getLockWatchdogTimeout(), TimeUnit.MILLISECONDS, threadId, RedisCommands.EVAL_NULL_BOOLEAN); ttlRemainingFuture.onComplete((ttlRemaining, e) -> { if (e == null) { if (ttlRemaining) { this.scheduleExpirationRenewal(threadId); } } }); return ttlRemainingFuture; } } |
此处出现leaseTime时间判断的2个分支,实际上就是加锁时是否设置过期时间,未设置过期时间(-1)时则会有watchDog 的锁续约 (下文),一个注册了加锁事件的续约任务。我们先来看有过期时间tryLockInnerAsync 部分,
evalWriteAsync是eval命令执行lua的入口
1 2 3 4 | RFuture tryLockInnerAsync(long leaseTime, TimeUnit unit, long threadId, RedisStrictCommand command) { this.internalLockLeaseTime = unit.toMillis(leaseTime); return this.commandExecutor.evalWriteAsync(this.getName(), LongCodec.INSTANCE, command, "if (redis.call('exists', KEYS[1]) == 0) then redis.call('hset', KEYS[1], ARGV[2], 1); redis.call('pexpire', KEYS[1], ARGV[1]); return nil; end; if (redis.call('hexists', KEYS[1], ARGV[2]) == 1) then redis.call('hincrby', KEYS[1], ARGV[2], 1); redis.call('pexpire', KEYS[1], ARGV[1]); return nil; end; return redis.call('pttl', KEYS[1]);", Collections.singletonList(this.getName()), new Object[]{this.internalLockLeaseTime, this.getLockName(threadId)}); } |
这里揭开真面目,eval命令执行Lua脚本的地方,此处的Lua脚本展开
1 2 3 4 5 6 7 8 9 10 11 12 13 14 15 16 | -- 不存在该key时if (redis.call('exists', KEYS[1]) == 0) then -- 新增该锁并且hash中该线程id对应的count置1 redis.call('hincrby', KEYS[1], ARGV[2], 1); -- 设置过期时间 redis.call('pexpire', KEYS[1], ARGV[1]); return nil; end; -- 存在该key 并且 hash中线程id的key也存在if (redis.call('hexists', KEYS[1], ARGV[2]) == 1) then -- 线程重入次数++ redis.call('hincrby', KEYS[1], ARGV[2], 1); redis.call('pexpire', KEYS[1], ARGV[1]); return nil; end; return redis.call('pttl', KEYS[1]); |
redisson具体参数分析
1 2 3 4 5 6 | // keyNameKEYS[1] = Collections.singletonList(this.getName())// leaseTimeARGV[1] = this.internalLockLeaseTime// uuid+threadId组合的唯一值ARGV[2] = this.getLockName(threadId) |
总共3个参数完成了一段逻辑:
- 判断该锁是否已经有对应
hash表存在, - 没有对应的
hash表:则set该hash表中一个entry的key为锁名称,value为1,之后设置该hash表失效时间为leaseTime - 存在对应的
hash表:则将该lockName的value执行+1操作,也就是计算进入次数,再设置失效时间leaseTime - 最后返回这把锁的ttl剩余时间
也和上述自定义锁没有区别
既然如此,那解锁的步骤也肯定有对应的-1操作,再看unlock方法,同样查找方法名,一路到
1 2 3 | protected RFuture unlockInnerAsync(long threadId) { return this.commandExecutor.evalWriteAsync(this.getName(), LongCodec.INSTANCE, RedisCommands.EVAL_BOOLEAN, "...lua...脚本", Arrays.asList(this.getName(), this.getChannelName()), new Object[]{LockPubSub.unlockMessage, this.internalLockLeaseTime, this.getLockName(threadId)}); } |
拿出Lua部分
1 2 3 4 5 6 7 8 9 10 11 12 13 14 15 16 17 | -- 不存在keyif (redis.call('hexists', KEYS[1], ARGV[3]) == 0) then return nil;end;-- 计数器 -1local counter = redis.call('hincrby', KEYS[1], ARGV[3], -1); if (counter > 0) then -- 过期时间重设 redis.call('pexpire', KEYS[1], ARGV[2]); return 0; else -- 删除并发布解锁消息 redis.call('del', KEYS[1]); redis.call('publish', KEYS[2], ARGV[1]); return 1;end; return nil; |
该Lua KEYS有2个Arrays.asList(getName(),getChannelName())
- name 锁名称
- channelName,用于pubSub发布消息的channel名称
ARGV变量有三个LockPubSub.UNLOCK_MESSAGE, internalLockLeaseTime, getLockName(threadId)
-
LockPubSub.UNLOCK_MESSAGE,channel发送消息的类别,此处解锁为0 -
internalLockLeaseTime,watchDog配置的超时时间,默认为30s -
lockName这里的lockName指的是uuid和threadId组合的唯一值
步骤如下:
- 如果该锁不存在则返回nil
- 如果该锁存在则将其线程的hash key计数器-1
- 计数器
counter>0,重置下失效时间,返回0;否则,删除该锁,发布解锁消息unlockMessage,返回1;
其中unLock的时候使用到了Redis发布订阅PubSub完成消息通知。
而订阅的步骤就在RedissonLock的加锁入口的lock方法里
1 2 3 4 5 6 7 8 9 10 11 | long threadId = Thread.currentThread().getId();Long ttl = this.tryAcquire(-1L, leaseTime, unit, threadId);if (ttl != null) { // 订阅 RFuture future = this.subscribe(threadId); if (interruptibly) { this.commandExecutor.syncSubscriptionInterrupted(future); } else { this.commandExecutor.syncSubscription(future); } // 省略 |
当锁被其他线程占用时,通过监听锁的释放通知(在其他线程通过RedissonLock释放锁时,会通过发布订阅pub/sub功能发起通知),等待锁被其他线程释放,也是为了避免自旋的一种常用效率手段
1.5.2 解锁消息
为了一探究竟通知了什么,通知后又做了什么,进入LockPubSub。
这里只有一个明显的监听方法onMessage,其订阅和信号量的释放都在父类PublishSubscribe,我们只关注监听事件的实际操作
1 2 3 4 5 6 7 8 9 10 11 12 13 14 15 16 17 18 19 20 21 22 | protected void onMessage(RedissonLockEntry value, Long message) { Runnable runnableToExecute; if (message.equals(unlockMessage)) { // 从监听器队列取监听线程执行监听回调 runnableToExecute = (Runnable)value.getListeners().poll(); if (runnableToExecute != null) { runnableToExecute.run(); } // getLatch()返回的是Semaphore,信号量,此处是释放信号量 // 释放信号量后会唤醒等待的entry.getLatch().tryAcquire去再次尝试申请锁 value.getLatch().release(); } else if (message.equals(readUnlockMessage)) { while(true) { runnableToExecute = (Runnable)value.getListeners().poll(); if (runnableToExecute == null) { value.getLatch().release(value.getLatch().getQueueLength()); break; } runnableToExecute.run(); } } } |
发现一个是默认解锁消息 ,一个是读锁解锁消息 ,因为redisson是有提供读写锁的,而读写锁读读情况和读写、写写情况互斥情况不同,我们只看上面的默认解锁消息unlockMessage分支
LockPubSub监听最终执行了2件事
-
runnableToExecute.run()执行监听回调 -
value.getLatch().release(); 释放信号量
Redisson通过LockPubSub 监听解锁消息,执行监听回调和释放信号量通知等待线程可以重新抢锁。
这时再回来看tryAcquireOnceAsync另一分支
1 2 3 4 5 6 7 8 9 10 11 12 13 14 15 | private RFuture tryAcquireOnceAsync(long waitTime, long leaseTime, TimeUnit unit, long threadId) { if (leaseTime != -1L) { return this.tryLockInnerAsync(waitTime, leaseTime, unit, threadId, RedisCommands.EVAL_NULL_BOOLEAN); } else { RFuture ttlRemainingFuture = this.tryLockInnerAsync(waitTime, this.commandExecutor.getConnectionManager().getCfg().getLockWatchdogTimeout(), TimeUnit.MILLISECONDS, threadId, RedisCommands.EVAL_NULL_BOOLEAN); ttlRemainingFuture.onComplete((ttlRemaining, e) -> { if (e == null) { if (ttlRemaining) { this.scheduleExpirationRenewal(threadId); } } }); return ttlRemainingFuture; } } |
可以看到,无超时时间时,在执行加锁操作后,还执行了一段费解的逻辑
1 2 3 4 5 6 7 | ttlRemainingFuture.onComplete((ttlRemaining, e) -> { if (e == null) { if (ttlRemaining) { this.scheduleExpirationRenewal(threadId); } } }) } } }) |
此处涉及到Netty的Future/Promise-Listener模型,Redisson中几乎全部以这种方式通信(所以说Redisson是基于Netty通信机制实现的),理解这段逻辑可以试着先理解
在 Java 的
Future中,业务逻辑为一个Callable或Runnable实现类,该类的call()或 run()执行完毕意味着业务逻辑的完结,在Promise机制中,可以在业务逻辑中人工设置业务逻辑的成功与失败,这样更加方便的监控自己的业务逻辑。
这块代码的表面意义就是,在执行异步加锁的操作后,加锁成功则根据加锁完成返回的ttl是否过期来确认是否执行一段定时任务。
这段定时任务的就是watchDog的核心。
1.5.3 锁续约
查看RedissonLock.this.scheduleExpirationRenewal(threadId)
1 2 3 4 5 6 7 8 9 10 11 12 13 14 15 16 17 18 19 20 21 22 23 24 25 26 27 28 29 30 31 32 33 34 35 36 | private void scheduleExpirationRenewal(long threadId) { RedissonLock.ExpirationEntry entry = new RedissonLock.ExpirationEntry(); RedissonLock.ExpirationEntry oldEntry = (RedissonLock.ExpirationEntry)EXPIRATION_RENEWAL_MAP.putIfAbsent(this.getEntryName(), entry); if (oldEntry != null) { oldEntry.addThreadId(threadId); } else { entry.addThreadId(threadId); this.renewExpiration(); } }private void renewExpiration() { RedissonLock.ExpirationEntry ee = (RedissonLock.ExpirationEntry)EXPIRATION_RENEWAL_MAP.get(this.getEntryName()); if (ee != null) { Timeout task = this.commandExecutor.getConnectionManager().newTimeout(new TimerTask() { public void run(Timeout timeout) throws Exception { RedissonLock.ExpirationEntry ent = (RedissonLock.ExpirationEntry)RedissonLock.EXPIRATION_RENEWAL_MAP.get(RedissonLock.this.getEntryName()); if (ent != null) { Long threadId = ent.getFirstThreadId(); if (threadId != null) { RFuture future = RedissonLock.this.renewExpirationAsync(threadId); future.onComplete((res, e) -> { if (e != null) { RedissonLock.log.error("Can't update lock " + RedissonLock.this.getName() + " expiration", e); } else { if (res) { RedissonLock.this.renewExpiration(); } } }); } } } }, this.internalLockLeaseTime / 3L, TimeUnit.MILLISECONDS); ee.setTimeout(task); } } |
拆分来看,这段连续嵌套且冗长的代码实际上做了几步:
- 添加一个
netty的Timeout回调任务,每(internalLockLeaseTime / 3)毫秒执行一次,执行的方法是renewExpirationAsync -
renewExpirationAsync重置了锁超时时间,又注册一个监听器,监听回调又执行了renewExpiration
renewExpirationAsync 的Lua如下
1 2 3 4 5 6 7 8 | protected RFuture renewExpirationAsync(long threadId) { return this.commandExecutor.evalWriteAsync(this.getName(), LongCodec.INSTANCE, RedisCommands.EVAL_BOOLEAN, "if (redis.call('hexists', KEYS[1], ARGV[2]) == 1) then redis.call('pexpire', KEYS[1], ARGV[1]); return 1; end; return 0;", Collections.singletonList(this.getName()), new Object[]{this.internalLockLeaseTime, this.getLockName(threadId)}); }if (redis.call('hexists', KEYS[1], ARGV[2]) == 1) then redis.call('pexpire', KEYS[1], ARGV[1]); return 1; end; return 0; |
重新设置了超时时间。Redisson加这段逻辑的目的是什么?
目的是为了某种场景下保证业务不影响,如任务执行超时但未结束,锁已经释放的问题。
当一个线程持有了一把锁,由于并未设置超时时间leaseTime,Redisson 默认配置了30S,开启watchDog,每10S对该锁进行一次续约,维持30S的超时时间,直到任务完成再删除锁。
这就是Redisson的锁续约 ,也就是WatchDog 实现的基本思路。
1.5.4 流程概括
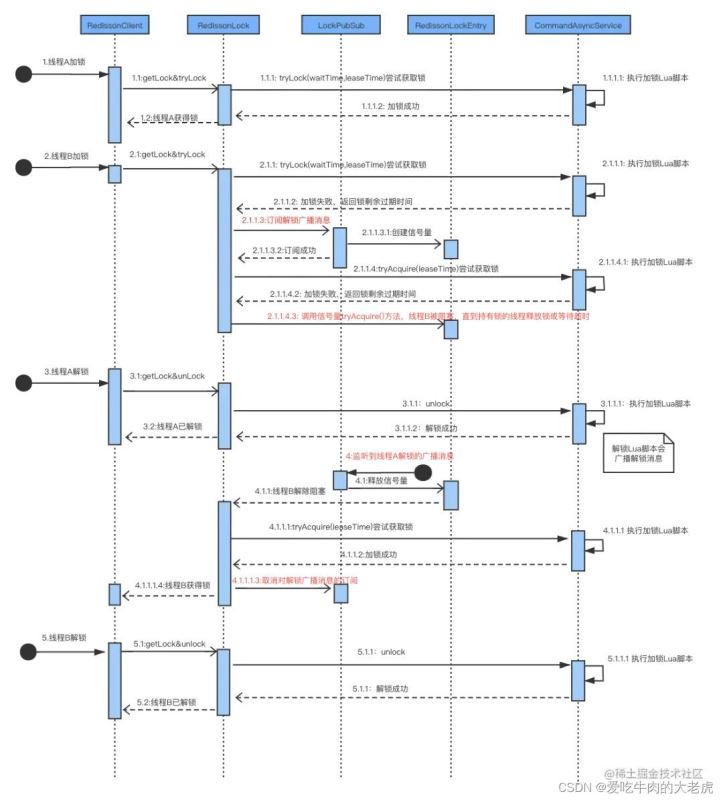
通过整体的介绍,流程简单概括:
- A、B线程争抢一把锁,A获取到后,B阻塞
- B线程阻塞时并非主动
CAS,而是PubSub方式订阅该锁的广播消息 - A操作完成释放了锁,B线程收到订阅消息通知
- B被唤醒开始继续抢锁,拿到锁
详细加锁解锁流程总结如下图:
1.6 公平锁
以上介绍的可重入锁是非公平锁,Redisson还基于Redis的队列(List)和ZSet实现了公平锁
1.6.1 java中公平锁
公平的定义是什么?
公平就是按照客户端的请求先来后到排队来获取锁,先到先得,也就是FIFO,所以队列和容器顺序编排必不可少
回顾JUC的ReentrantLock公平锁的实现
1 2 3 4 5 6 7 8 9 10 11 12 13 14 15 16 17 18 19 20 21 22 23 24 25 | /** * Sync object for fair locks */static final class FairSync extends Sync { private static final long serialVersionUID = -3000897897090466540L; final void lock() { acquire(1); } /** * Fair version of tryAcquire. Don't grant access unless * recursive call or no waiters or is first. */ protected final boolean tryAcquire(int acquires) { final Thread current = Thread.currentThread(); int c = getState(); if (c == 0) { if (!hasQueuedPredecessors() && compareAndSetState(0, acquires)) { setExclusiveOwnerThread(current); return true; } } else if (current == getExclusiveOwnerThread()) { int nextc = c + acquires; if (nextc |
AQS已经提供了整个实现,是否公平取决于实现类取出节点逻辑是否顺序取
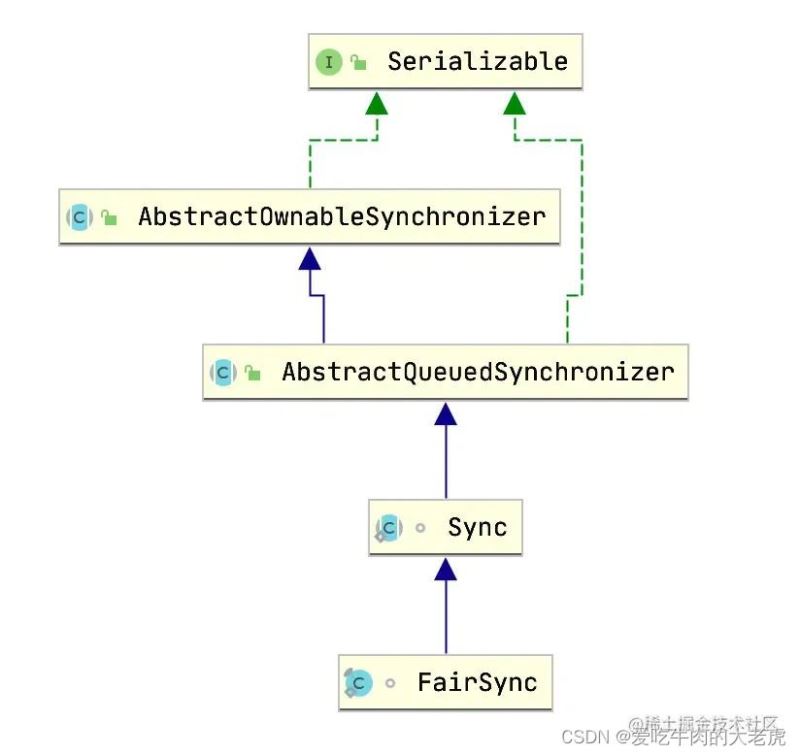
AbstractQueuedSynchronizer是用来构建锁或者其他同步组件的基础框架,通过内置FIFO队列来完成资源获取线程的排队工作,自身没有实现同步接口,仅仅定义了若干同步状态获取和释放的方法来供自定义同步组件使用(上图),支持独占和共享获取,这是基于模版方法模式的一种设计,给公平/非公平提供了土壤。
我们用2张图来简单解释AQS的等待流程
一张是同步队列(FIFO双向队列)管理 获取同步状态失败(抢锁失败)的线程引用、等待状态和前驱后继节点的流程图
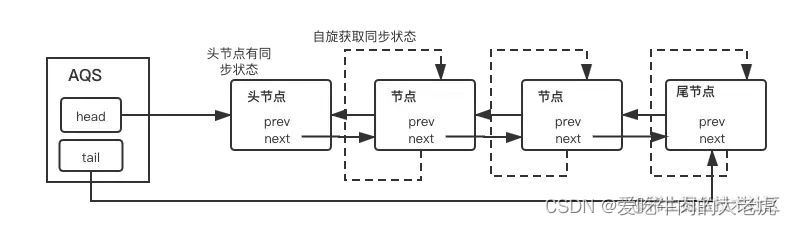
一张是独占式获取同步状态的总流程 ,核心acquire(int arg)方法调用流程
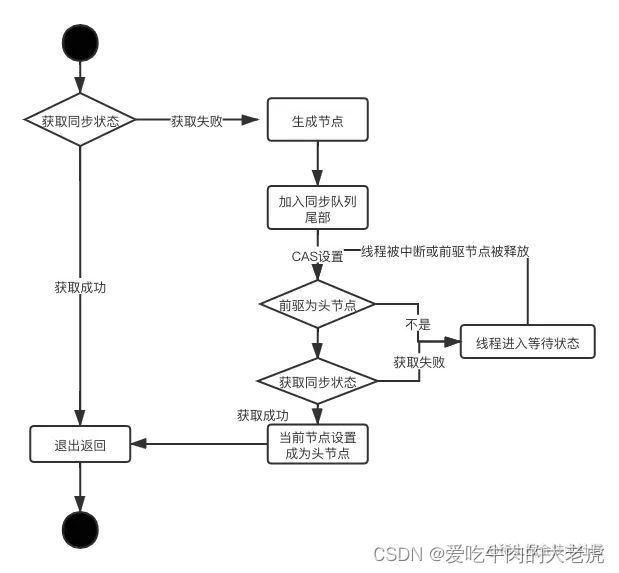
可以看出锁的获取流程AQS维护一个同步队列,获取状态失败的线程都会加入到队列中进行自旋,移出队列或停止自旋的条件是前驱节点为头节点切成功获取了同步状态。而比较另一段非公平锁类NonfairSync可以发现,控制公平和非公平的关键代码,在于hasQueuedPredecessors方法。
1 2 3 4 5 6 7 8 9 10 11 12 13 14 15 16 | static final class NonfairSync extends Sync { private static final long serialVersionUID = 7316153563782823691L; /** * Performs lock. Try immediate barge, backing up to normal * acquire on failure. */ final void lock() { if (compareAndSetState(0, 1)) setExclusiveOwnerThread(Thread.currentThread()); else acquire(1); } protected final boolean tryAcquire(int acquires) { return nonfairTryAcquire(acquires); }} |
NonfairSync减少了了hasQueuedPredecessors判断条件,该方法的作用就是
- 查看同步队列中当前节点是否有前驱节点,如果有比当前线程更早请求获取锁则返回true。
- 保证每次都取队列的第一个节点(线程)来获取锁,这就是公平规则
为什么JUC以默认非公平锁呢?
因为当一个线程请求锁时,只要获取来同步状态即成功获取。在此前提下,刚释放的线程再次获取同步状态的几率会非常大,使得其他线程只能在同步队列中等待。但这样带来的好处是,非公平锁大大减少了系统线程上下文的切换开销。
可见公平的代价是性能与吞吐量。
Redis里没有AQS,但是有List和zSet,看看Redisson是怎么实现公平的
1.6.2 RedissonFairLock
RedissonFairLock 用法依然很简单
1 | RLock fairLock = redissonClient.getFairLock(lockName);fairLock.lock(); |
RedissonFairLock继承自RedissonLock,同样一路向下找到加锁实现方法tryLockInnerAsync 。
这里有2段冗长的Lua,但是Debug发现,公平锁的入口在 command == RedisCommands.EVAL_LONG 之后,此段Lua较长,参数也多,我们着重分析Lua的实现规则
参数
1 2 3 4 5 6 7 8 9 10 | -- lua中的几个参数KEYS = Arrays.<object data-origwidth="" data-origheight="" style="width: 1264px;">asList(getName(), threadsQueueName, timeoutSetName)KEYS[1]: lock_name, 锁名称 KEYS[2]: "redisson_lock_queue:{xxx}" 线程队列KEYS[3]: "redisson_lock_timeout:{xxx}" 线程id对应的超时集合ARGV = internalLockLeaseTime, getLockName(threadId), currentTime + threadWaitTime, currentTimeARGV[1]: "{leaseTime}" 过期时间ARGV[2]: "{Redisson.UUID}:{threadId}" ARGV[3] = 当前时间 + 线程等待时间:(10:00:00) + 5000毫秒 = 10:00:05ARGV[4] = 当前时间(10:00:00) 部署服务器时间,非redis-server服务器时间</object> |
公平锁实现的Lua脚本
1 2 3 4 5 6 7 8 9 10 11 | -- 1.死循环清除过期keywhile true do -- 获取头节点 local firstThreadId2 = redis.call('lindex', KEYS[2], 0); -- 首次获取必空跳出循环 if firstThreadId2 == false then break; end; -- 清除过期key local timeout = tonumber(redis.call('zscore', KEYS[3], firstThreadId2)); if timeout |
1.6.3 公平锁加锁步骤
通过以上Lua,可以发现,lua操作的关键结构是列表(list)和有序集合(zSet)。
其中 list 维护了一个等待的线程队列 redisson_lock_queue:{xxx},zSet维护了一个线程超时情况的有序集合 redisson_lock_timeout:{xxx},尽管lua较长,但是可以拆分为6个步骤
- 队列清理
保证队列中只有未过期的等待线程 - 首次加锁
hset加锁,pexpire过期时间 - 重入判断
此处同可重入锁lua - 返回ttl
- 计算尾节点ttl
初始值为锁的剩余过期时间 - 末尾排队
ttl + 2 * currentTime + waitTime是score的默认值计算公式
以上就是Redis之Redisson原理详解的详细内容,更多关于Redisson原理的资料请关注IT俱乐部其它相关文章!

