
Vue3中手动清理keep-alive组件缓存的一个解决方案
源码
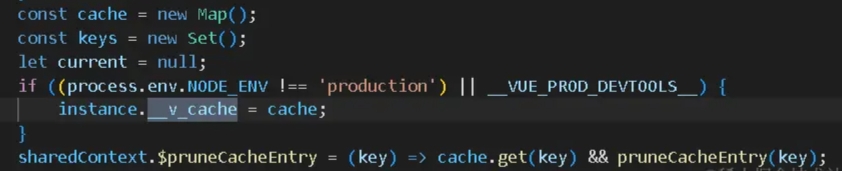
1 2 3 4 5 6 7 8 9 10 11 12 13 14 15 16 17 18 19 | if ((process.env.NODE_ENV !== 'production') || __VUE_PROD_DEVTOOLS__) { instance.__v_cache = cache; } //省略一些代码... function pruneCacheEntry(key) { const cached = cache.get(key); if (!current || cached.type !== current.type) { unmount(cached); } else if (current) { // current active instance should no longer be kept-alive. // we can't unmount it now but it might be later, so reset its flag now. resetShapeFlag(current); } cache.delete(key); keys.delete(key); } |
这里表明我们有两种修改方案:
方案一:注释 instance.__v_cache = cache; 这行代码的判断条件,也就是注释掉它的if判断,这样无论在什么环境,我们都可以取到__v_cache对象,这样就可以按照上一篇的方案来解决手动释放的问题
方案二:注意到源码中的pruneCacheEntry函数就是通过key来释放缓存,所以如果仅仅是想通过key来释放缓存,那么可以通过将pruneCacheEntry函数暴露出来实现我们的要求
方案一
修改vue.config.js,在文件开头添加下面的代码:
1 2 3 4 5 6 7 8 9 10 11 12 13 14 15 16 17 18 19 20 21 22 23 24 25 26 27 28 29 30 31 32 33 34 35 36 37 | const path = require("path");const fs = require("fs");try { const vue_bundler_file = path.resolve( __dirname, "node_modules/@vue/runtime-core/dist/runtime-core.esm-bundler.js" ); //使用同步读取文件 let data = fs.readFileSync(vue_bundler_file, "utf8"); //如果未添加过 if (data.indexOf("//__v_cache") = 0) { // 继续往前找if关键字 index = data.lastIndexOf("if ", index); if (index >= 0) { //从上一个位置开始 index -= 1; //然后放一个注释 const comment = " //__v_cache "; //然后拼接 data = data.substring(0, index) + comment + data.substring(index); //继续往后找下一个大括号 } index = data.indexOf("}", index); if (index >= 0) { //从上一个位置开始 index -= 1; //然后拼接 data = data.substring(0, index) + comment + data.substring(index); } fs.writeFileSync(vue_bundler_file, data, "utf8"); } } }} catch (er) { console.error(er.message);} |
然后重新启动运行项目,就可以按照上一篇的方式,通过 __v_cache 对象来手动清理keep-alive的缓存了。
1 2 3 4 5 6 7 8 9 10 11 12 13 14 15 16 17 | export default { setup() { const instance = getCurrentInstance(); const handler = new KeepAliveHandler(); onMounted(() => { const keepAlive = instance.refs.keepAlive; handler.bind(keepAlive); }); const remove = (key) => { handler.remove(key); }; return { remove, }; },}; |
如果打开 node_modules/@vue/runtime-core/dist/runtime-core.esm-bundler.js 文件,搜索 __v_cache ,会看到这样的代码片段:

方案二
在 vue.config.js 中开头添加如下代码:
1 2 3 4 5 6 7 8 9 10 11 12 13 14 15 16 17 18 19 20 21 22 23 24 25 26 27 28 29 30 31 32 33 | const path = require("path");const fs = require("fs");try { const vue_bundler_file = path.resolve( __dirname, "node_modules/@vue/runtime-core/dist/runtime-core.esm-bundler.js" ); //使用同步读取文件 const data = fs.readFileSync(vue_bundler_file, "utf8"); //如果未添加过 if (data.indexOf("sharedContext.$pruneCacheEntry") = 0) { // 继续找下一个大括号 } index = data.indexOf("}", index); if (index >= 0) { //从下一个位置开始 index += 1; //然后放一个可以释放的函数 const remove = " sharedContext.$pruneCacheEntry = (key) => cache.get(key) && pruneCacheEntry(key);"; //然后拼接 const result = data.substring(0, index) + "rn" + remove + "rn" + data.substring(index); fs.writeFileSync(vue_bundler_file, result, "utf8"); } } }} catch (er) { console.error(er.message);} |
1 2 3 4 5 6 7 8 9 10 11 12 13 14 15 16 17 18 19 20 21 22 23 24 25 26 27 28 29 30 31 32 33 34 35 36 37 38 39 40 41 42 43 44 | const path = require("path");const fs = require("fs");try { const vue_bundler_file = path.resolve( __dirname, "node_modules/@vue/runtime-core/dist/runtime-core.esm-bundler.js" ); //使用同步读取文件 const data = fs.readFileSync(vue_bundler_file, "utf8"); //如果未添加过 if (data.indexOf("sharedContext.$pruneCacheEntry") = 0) { // 继续找下一个大括号 } index = data.indexOf("}", index); if (index >= 0) { //从下一个位置开始 index += 1; //然后放一个可以释放的函数 const remove = " sharedContext.$pruneCacheEntry = function(key) {rn" + " const cached = cache.get(key);rn" + " if (cached) {rn" + " if (cached.key == current?.key) {rn" + " resetShapeFlag(current);rn" + " } else {rn" + " unmount(cached);rn" + " }rn" + " cache.delete(key);rn" + " keys.delete(key);rn" + " }rn" + " }rn" //然后拼接 const result = data.substring(0, index) + "rn" + remove + "rn" + data.substring(index); fs.writeFileSync(vue_bundler_file, result, "utf8"); } } }} catch (er) { console.error(er.message);} |
之后,我们项目重新运行后,就可以通过ref取到keep-alive组件的引用,然后使用这个引用对象直接使用$pruneCacheEntry函数来删除指定key的缓存了:
1 | this.$refs.keepAlive.$pruneCacheEntry("key") |
如果打开 node_modules/@vue/runtime-core/dist/runtime-core.esm-bundler.js 文件,搜索 __v_cache ,会看到这样的代码片段:
结语
目前,目前还没有找到更好的解决方案,我自己采用的是第二种方案,算是暂时解决了问题,当然,两种方案可以结合使用。
到此这篇关于Vue3手动清理keep-alive组件缓存的方法详解的文章就介绍到这了,更多相关Vue3清理keep-alive组件缓存内容请搜索IT俱乐部以前的文章或继续浏览下面的相关文章希望大家以后多多支持IT俱乐部!

