
本文使用vue2.0+elementui 制作一个上门取件时间组件,类似顺丰,样式如下:
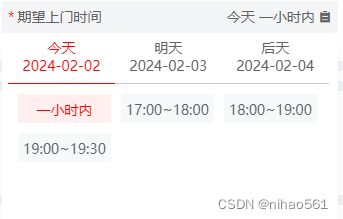
大概功能:点击期望上门时间,下面出现一个弹框可以选择时间:
首先我们定义一些需要的数据:
1 2 3 4 5 6 7 8 9 10 11 12 13 14 15 16 17 18 19 20 21 22 23 24 25 26 | data() { return { isDropdown: false, dayList: [], listArray: [ "08:00~09:00", "09:00~10:00", "10:00~11:00", "11:00~12:00", "12:00~13:00", "13:00~14:00", "14:00~15:00", "15:00~16:00", "16:00~17:00", "17:00~18:00", "18:00~19:00", "19:00~19:30", ], timeToList: { }, timeValue: "今天", clickValue: "一小时内", clickDay: "今天", time: "", } }, |
接着我们画一个期望上门时间的长框,点击可以出现弹窗,点击外部弹窗消失,这中间我们使用了import Clickoutside from ‘element-ui/src/utils/clickoutside’ 这一组件,来帮助我们达到这个目的
1 2 3 4 5 6 7 8 9 10 11 12 13 14 15 16 17 18 19 20 21 22 23 24 25 26 27 28 29 30 31 32 33 34 35 36 37 38 39 40 41 42 43 44 45 46 47 48 49 50 51 52 53 54 55 56 57 58 59 60 61 62 63 64 65 66 67 68 69 70 71 72 73 74 75 76 77 78 79 80 81 82 83 84 85 86 87 88 89 90 91 92 93 94 95 96 97 98 99 100 101 102 103 104 105 106 107 108 109 110 111 112 113 114 115 116 117 118 119 120 121 122 123 124 125 126 127 128 129 130 131 132 133 134 135 136 137 138 139 140 141 142 143 144 145 146 147 148 149 150 151 152 153 154 155 156 157 158 159 160 161 162 163 164 165 166 167 168 169 170 171 172 173 174 175 176 177 178 179 180 181 182 183 184 185 186 187 188 189 190 191 192 193 194 195 196 197 198 199 200 201 202 203 204 205 206 207 208 209 210 211 212 213 214 215 216 217 218 219 220 221 222 223 224 225 226 227 228 229 230 231 232 | <div class="time-picker"> <div class="content-first"> <div class="redSpan">*</div> <div>期望上门时间</div> </div> <div class="content-first"> <div> {{ time }} </div> <i class="el-icon-s-order"></i> </div></div><p>接下来画一个弹出页面,弹出页面顶部是一个tab组件,这里通过daylist循环获得</p><div class="jb51code"><pre class="brush:xhtml;"> <div class="time"> <div class="item"> <div>{{ item.lable }}</div> <div>{{ item.ymd }}</div> </div> </div></pre></div><p>tab组件中的内容,是下单时间的按钮集合,通过timeToList 这个结构体 ,先获取数组再循环生成</p><div class="jb51code"><pre class="brush:xhtml;"> <div class="timeList"> <div class="timeBox"> {{ item.lable }} </div> </div></pre></div><p>页面写好了我们开始写逻辑代码,先需要一些工具函数获取小时、分钟、年月日,一个用来判定点击了哪个按钮的list(由于是双层结构tab+button集,所以需要两个值来判定),一个获取今天按钮列表的函数:</p><div class="jb51code"><pre class="brush:js;"> getHours() { const now = new Date(); return now.getHours(); }, getMinute() { const now = new Date(); return now.getMinutes(); }, formatDate(date) { const year = date.getFullYear(); const month = String(date.getMonth() + 1).padStart(2, '0'); const day = String(date.getDate()).padStart(2, '0'); return `${year}-${month}-${day}`; }, transTime(arr, day) { let temp = [] arr.forEach((item) => { temp.push({ lable: item, day: day }) }) return temp }, getTodayList(arr) { let minute = this.getMinute() let hour = this.getHours() if (hour = 19 && minute > 30) return [] arr = arr.slice(hour - 7) arr = ['一小时内', ...arr] return arr }</pre></div><p>然后我们需要先初始化数据</p><div class="jb51code"><pre class="brush:js;"> initial() { let minute = this.getMinute() let hour = this.getHours() if (hour = 19 && minute > 30) { this.clickValue = "08:00~09:00" this.clickDay = "明天" return } },</pre></div><p>然后将时间赋值,这里其实可以用computed,但是我还是习惯自己做这部分操作</p><div class="jb51code"><pre class="brush:js;"> setTime() { this.time = this.clickDay + ' ' + this.clickValue },</pre></div><p>接下来我们需要生成tab表单dayList,以及每个tab页面下面的时间选项,用了上面的两个工具函数getTodayList(),transTime()</p><div class="jb51code"><pre class="brush:js;"> getDay() { const today = new Date() const tomorrow = new Date(today) tomorrow.setDate(tomorrow.getDate() + 1) const afterTomorrow = new Date(today) afterTomorrow.setDate(afterTomorrow.getDate() + 2) let dayArray = [this.formatDate(today), this.formatDate(tomorrow), this.formatDate(afterTomorrow)] let dayName = ['今天', '明天', '后天'] this.dayList = dayName.map((item, index) => { return { lable: item, ymd: dayArray[index] } }) }, getTimeToList() { this.dayList.forEach((item) => { let arr = JSON.parse(JSON.stringify(this.listArray)) if (item.lable === "今天") arr = this.getTodayList(arr) this.timeToList[item.lable] = this.transTime(arr, item.lable) }) },</pre></div><p>通过上面的初始化函数,可以生成下拉页面的组件内容,函数顺序如下</p><div class="jb51code"><pre class="brush:js;"> mounted() { this.initial() this.setTime() this.getDay() this.getTimeToList() },</pre></div><p>最后我们添加一些点击动作,完整代码</p><div class="jb51code"><pre class="brush:js;"> openDown() {//打开下来框 this.isDropdown = true }, clickoutside(e) {//关闭下拉框 if (!e) { this.isDropdown = false this.timeValue = this.clickDay } }, dayChange(item) {//切换tab页面 this.timeValue = item.lable }, timeChange(item) {//选择下单时间 this.clickValue = item.lable this.clickDay = item.day this.setTime() },</pre></div><p>贴一下css代码</p><div class="jb51code"><pre class="brush:css;">.time-picker { background-color: #f4f5f7; width: 336px; height: 32px; padding: 0 6px; display: flex; justify-content: space-between; cursor: pointer; .content-first { display: flex; align-items: center; gap: 3px; .redSpan { color: red; } } .dropdown { position: absolute; top: 32px; right: 0px; z-index: 99; width: 100%; height: 220px; background-color: #fff; box-shadow: 0 8px 12px 0 rgba(0, 0, 0, 0.04); border-radius: 10px; padding: 6px; .time { display: flex; .item { width: 33%; height: 45px; text-align: center; font-size: 14px; line-height: 18px; border-bottom: 1px solid #cccccc; } .active { color: red; border-bottom: 1px solid red; } } .timeList { padding: 10px; display: flex; align-items: center; flex-wrap: wrap; gap: 10px; .timeBox { width: 93px; height: 29px; background-color: #f7f8fa; text-align: center; } .timeBox:hover { color: red; } .active { color: red; background-color: #ffefef; } } }}</pre></div><p>完整代码已经上传github:<a href="https://github.com/majinihao123/vue-Component" rel="external nofollow noopener" target="_blank">https://github.com/majinihao123/vue-Component</a></p><p><strong>总结</strong></p><p>到此这篇关于vue2.0+elementui实现一个上门取件时间组件的文章就介绍到这了,更多相关Vue上门取件时间组件内容请搜索IT俱乐部以前的文章或继续浏览下面的相关文章希望大家以后多多支持IT俱乐部!</p><p></p> |
相关文章
-
 下面小编就为大家分享一篇vue.js-div滚动条隐藏但有滚动效果的实现方法,具有很好的参考价值,希望对大家有所帮助。一起跟随小编过来看看吧
2018-03-03
-
 这篇文章主要介绍了element-ui table表格底部合计自定义配置过程,具有很好的参考价值,希望对大家有所帮助,如有错误或未考虑完全的地方,望不吝赐教
2023-10-10
-
 这篇文章主要介绍了vue项目中各文件的使用说明,具有很好的参考价值,希望对大家有所帮助,如有错误或未考虑完全的地方,望不吝赐教
2024-02-02
-
 这篇文章主要为大家介绍了Vue cli3 chainWepack使用方法示例详解,有需要的朋友可以借鉴参考下,希望能够有所帮助,祝大家多多进步,早日升职加薪
2023-11-11
-
 这篇文章主要介绍了vue+iview+less 实现换肤功能,项目搭建用的vue—cli,css框架选择的iview,具体操作流程大家跟随IT俱乐部小编一起看看吧
2018-08-08
-

浅谈vue中关于checkbox数据绑定v-model指令的个人理解
这篇文章主要介绍了浅谈vue中关于checkbox数据绑定v-model指令的个人理解,v-model用于表单的数据绑定很常见,下面就来详细的介绍一下2018-11-11
-
 这篇文章主要介绍了关于axios配置多个请求地址(打包后可通过配置文件修改),具有很好的参考价值,希望对大家有所帮助。如有错误或未考虑完全的地方,望不吝赐教
2022-09-09
-

vuejs2.0实现分页组件使用$emit进行事件监听数据传递的方法
这篇文章主要介绍了vuejs2.0实现分页组件使用$emit进行事件监听数据传递的方法,非常不错,具有参考借鉴价值,,需要的朋友可以参考下2017-02-02
-
 这篇文章主要介绍了VScode编辑器vue环境搭建所遇问题解决方案,文中通过示例代码介绍的非常详细,对大家的学习或者工作具有一定的参考学习价值,需要的朋友们下面随着小编来一起学习学习吧
2019-04-04
-
 通常情况下,父子组件的通信都是单向的,或父组件使用props向子组件传递数据,或子组件使用emit函数向父组件传递数据,本文将尝试讲解Vue中常用的几种双向数据流的使用,需要的朋友可以参考下
2023-08-08


最新评论