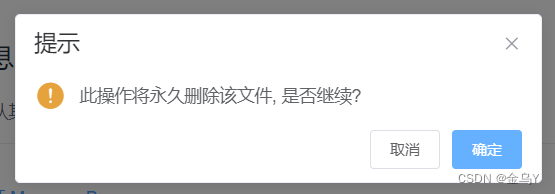
通常使用 confirm 确认框时,一般这样写:
点击打开 Message Box
  export default {
    methods: {
      open() {
        this.$confirm('此操作将永久删除该文件, 是否继续?', '提示', {
          confirmButtonText: '确定',
          cancelButtonText: '取消',
          type: 'warning'
        }).then(() => {
          this.$message({
            type: 'success',
            message: '删除成功!'
          });
        }).catch(() => {
          this.$message({
            type: 'info',
            message: '已取消删除'
          });
        });
      }
    }
  }

但偶尔也需要修改文字等样式,这时该怎么做呢?
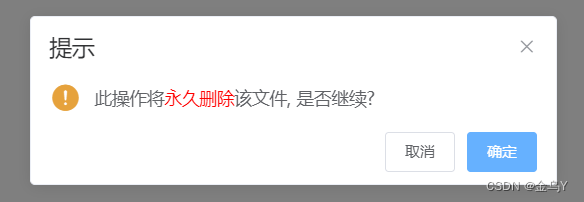
一、 将dangerouslyUseHTMLString属性设置为 true,message 就会被当作 HTML 片段处理。
提示文字中,修改部分字体样式时,可以这样做:

点击打开 Message Box
  export default {
    methods: {
      open() {
        this.$confirm('此操作将永久删除该文件, 是否继续?', '提示', {
          confirmButtonText: '确定',
          cancelButtonText: '取消',
          dangerouslyUseHTMLString: true, // 使用HTML片段
          type: 'warning'
        }).then(() => {
          this.$message({
            type: 'success',
            message: '删除成功!'
          });
        }).catch(() => {
          this.$message({
            type: 'info',
            message: '已取消删除'
          });
        });
      }
    }
  }
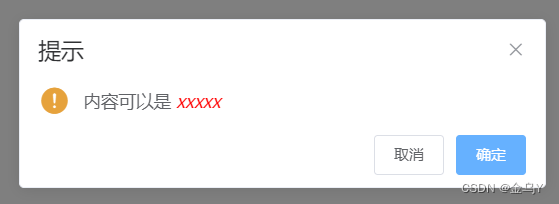
二、createElement 新建元素和对象,然后对新建的元素进行标签化设置。

点击打开 Message Box
  export default {
    methods: {
      open() {
        const h = this.$createElement
        this.$confirm(
          '提示',
        {
          confirmButtonText: '确定',
          cancelButtonText: '取消',
          type: 'warning',
          message:h('p', null, [
	           h('span', null, '内容可以是 '),
	           h('i', { style: 'color: red' }, 'xxxxx')
          ]),
          // iconClass:"el-icon-question colorYellow", // 需要修改 icon 图标,需要把注释代码打开,其中 colorYellow 表示图标颜色,(自定义图标的类名,会覆盖 type)

        }).then(() => {
          this.$message({
            type: 'success',
            message: '删除成功!'
          });
        }).catch(() => {
          this.$message({
            type: 'info',
            message: '已取消删除'
          });
        });
      }
    }
  }
设置 iconClass 属性,可以更改icon:

三、文字换行显示

点击打开 Message Box
  export default {
    methods: {
      open() {
        const confirmText = ['第一行内容',  '第二行内容','第三行内容']
        const newData = []
        const h = this.$createElement
        for (const i in confirmText) {
            newData.push(h('p', null, confirmText[i]))
        }

        this.$confirm(
          '提示',
        {
          title:'提示',
          confirmButtonText: '确定',
          cancelButtonText: '取消',
          type: 'warning',
          message: h('div', null, newData),
        }).then(() => {
          this.$message({
            type: 'success',
            message: '删除成功!'
          });
        }).catch(() => {
          this.$message({
            type: 'info',
            message: '已取消删除'
          });
        });
      }
    }
  }
四、使用 customClass 设置MessageBox 的自定义类名,从而自定义样式
点击打开 Message Box
  export default {
    methods: {
      open() {
        this.$confirm('此操作将永久删除该文件, 是否继续?', '提示', {
          confirmButtonText: '确定',
          cancelButtonText: '取消',
          type: 'warning',
          customClass:'del-model', // 设置MessageBox 的自定义类名
        }).then(() => {
          this.$message({
            type: 'success',
            message: '删除成功!'
          });
        }).catch(() => {
          this.$message({
            type: 'info',
            message: '已取消删除'
          });
        });
      }
    }
  }

//注意这里不能将样式放到scoped中!!!

.del-model {
  .el-button:nth-child(1) {
    width: 100px;//修改确认按钮的宽度
  }
  .el-button:nth-child(2) {
    margin-right: 10px;
    background-color: #2d8cf0;
    border-color: #2d8cf0;
  }
}
附:vue element插件this.$confirm用法(取消也可以发请求)
场景:弹出框的两个按钮都能分别请求接口
最简单的弹出框就是“确定”“取消”,一般用户点击确定才会继续接下来的动作,点击取消则不做任何动作(即不会请求接口)。
如:
点击打开 Message Box
  export default {
    methods: {
      open() {
        this.$confirm('此操作将永久删除该文件, 是否继续?', '提示', {
          confirmButtonText: '确定',
          cancelButtonText: '取消',
          type: 'warning'
        }).then(() => {
          this.$message({
            type: 'success',
            message: '删除成功!'
          });
        }).catch(() => {
          this.$message({
            type: 'info',
            message: '已取消删除'
          });
        });
      }
    }
  }
两个按钮都请求,则:
//任务下线
 offline(data){
     this.$confirm('是否开启保存点?', {
         distinguishCancelAndClose: true,
         confirmButtonText: '是',
         cancelButtonText: '否', //相当于 取消按钮
         type: 'warning'
     }).then(() => {
         api.taskOffline({taskId: data.taskId, isSavepoint: '1'}).then(res => {
             if (res.data.code === "100") {
                 this.$message({type: 'success', message: '下线成功!'})
                 this.getTableData()
             } else {
                 this.$message({type: 'error', message: res.data.msg})
                 this.getTableData()
             }
         })
     }).catch(action => {
     //判断是 cancel (自定义的取消) 还是 close (关闭弹窗)
         if (action === 'cancel'){
             api.taskOffline({taskId: data.taskId, isSavepoint: '0'}).then(res => {
                 if (res.data.code === "100") {
                     this.$message({type: 'success', message: '下线成功!'})
                     this.getTableData()
                 } else {
                     this.$message({type: 'error', message: res.data.msg})
                     this.getTableData()
                 }
             })
         }
     })
默认情况下,当用户触发取消(点击取消按钮)和触发关闭(点击关闭按钮或遮罩层、按下 ESC 键)时,Promise 的 reject 回调和callback回调的参数均为 ‘cancel’(普通弹出框中的点击取消时的回调参数)。如果将distinguishCancelAndClose属性设置为 true,则上述两种行为的参数分别为 ‘cancel’ 和 ‘close’。(注意:如果没有设置distinguishCancelAndClose为true,则都默认为取消)
这样就可以在catch中拿到回调参数action进行判断做什么操作了
总结
到此这篇关于vue修改this.$confirm的文字样式、自定义样式的文章就介绍到这了,更多相关vue修改this.$confirm文字样式内容请搜索IT俱乐部以前的文章或继续浏览下面的相关文章希望大家以后多多支持IT俱乐部!

